
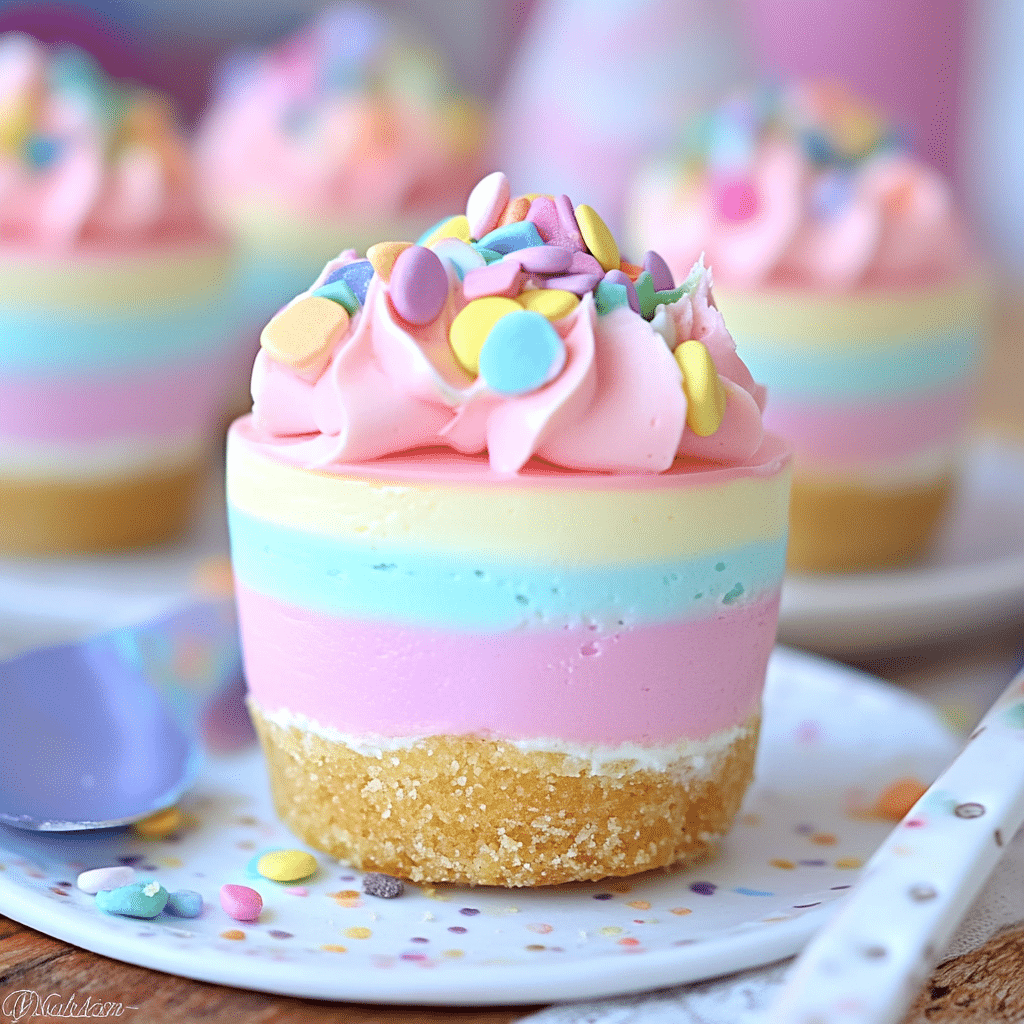
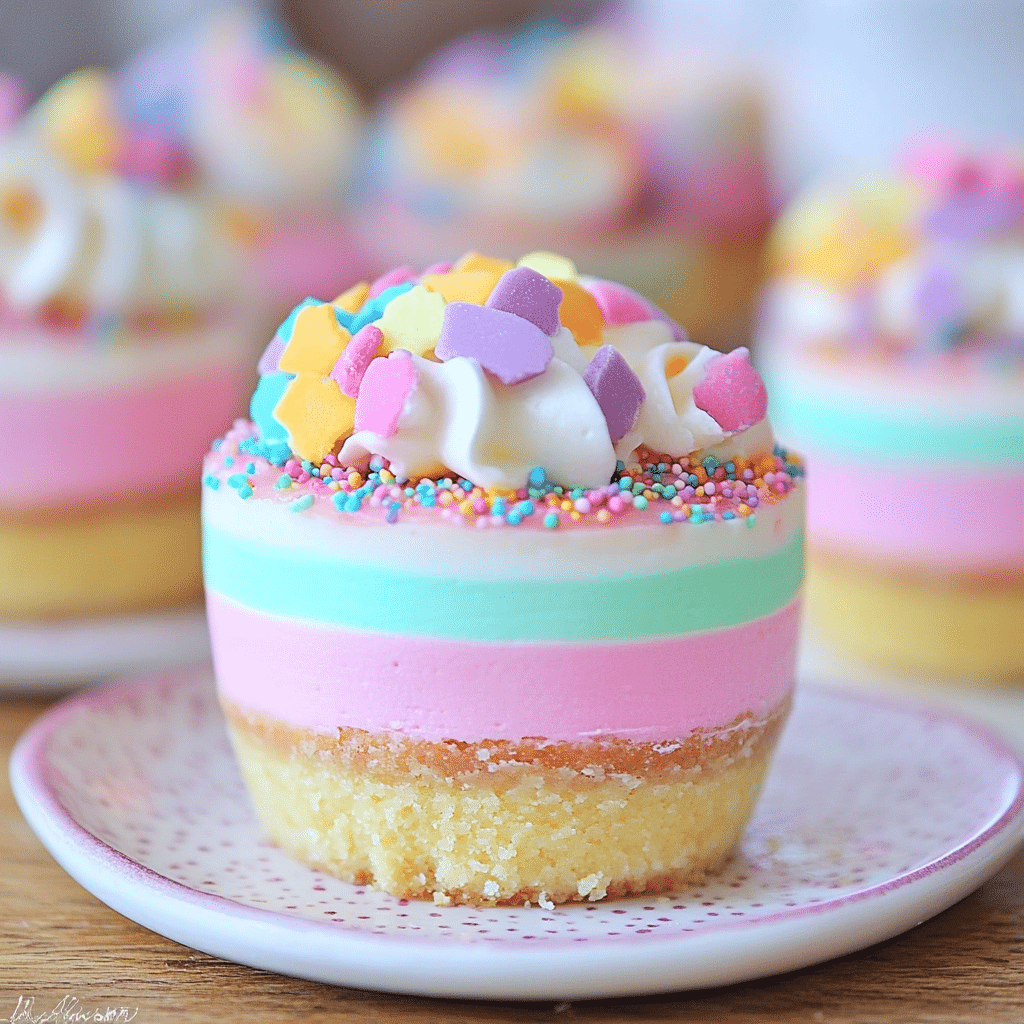
Easter is a time to celebrate, and what better way to indulge than with these adorable, no-bake mini cheesecakes? These cheesecakes are perfect for springtime gatherings, offering a creamy, decadent filling atop a buttery shortbread cookie crust. You can make them ahead of time, which is a bonus when you’re busy planning the rest of the holiday menu. The vibrant, pastel-colored layers add a fun, festive touch, and the whipped cream, candy eggs, and sprinkles make them a treat that’s both visually stunning and irresistibly delicious.
These mini cheesecakes are the perfect dessert for Easter brunch or dinner. The combination of tangy cream cheese, sweet vanilla bean, and a hint of lemon juice provides a balanced flavor, while the colorful layers give each mini cheesecake an eye-catching appeal. Not only do these cheesecakes look beautiful, but they also require minimal effort—no baking involved! Plus, you can easily customize the colors and decorations to suit your celebration.
Why You’ll Love This Recipe
1. No-Bake Simplicity
These cheesecakes come together quickly and don’t require any baking, making them perfect for busy holiday preparations.
2. Festive and Fun
The colorful layers and cute decorations make these mini cheesecakes a showstopper at any Easter gathering.
3. Perfectly Creamy Texture
Thanks to the smooth cream cheese filling, these cheesecakes are delightfully creamy and rich without being overly sweet.
4. Customizable Decorations
Decorate with colorful whipped cream, sprinkles, and candy eggs to match your holiday theme.
5. Make-Ahead
You can prepare these cheesecakes in advance, freeing up your time on the big day to enjoy with family and friends.
Disclosure: This post contains affiliate links.If you click and make a purchase, I may earn a small commission at no extra cost to you.

Ingredients
For the Crust
- Shortbread cookies
- Unsalted butter, melted
For the Cheesecake Filling
- Cream cheese, at room temperature
- Granulated sugar
- Lemon juice
- Vanilla bean paste (or vanilla extract)
- Pinch of salt
- Heavy cream, at room temperature
- Unflavored powdered gelatin
- Cold water
For Decorating
- Whipped cream
- Assorted gel food coloring
- Candy eggs
- Sprinkles
Variations
- Fruit Topping: Top your mini cheesecakes with fresh berries or a fruit compote for added flavor.
- Chocolate Drizzle: Drizzle melted chocolate over the top for a richer, indulgent version.
- Gluten-Free: Swap the shortbread cookies for a gluten-free alternative like gluten-free graham crackers.
- Dairy-Free: Use non-dairy cream cheese and coconut milk in place of the heavy cream for a dairy-free option.
How to Make the Recipe
Step 1: Prepare the Crust
Crush the shortbread cookies into fine crumbs, then mix with melted butter until the mixture resembles wet sand. Press the mixture into the bottom of mini cheesecake pans or muffin cups to form an even layer. Refrigerate the crusts to set while you prepare the filling.
Step 2: Dissolve the Gelatin
In a small bowl, combine the cold water with the unflavored gelatin. Stir and let it sit for a few minutes to bloom. Once the gelatin has absorbed the water, heat it in the microwave for 10-15 seconds until fully dissolved. Set aside to cool.
Step 3: Make the Cheesecake Filling
In a large mixing bowl, beat the cream cheese, granulated sugar, lemon juice, vanilla bean paste, and a pinch of salt until smooth and creamy. In a separate bowl, whip the heavy cream to soft peaks. Gently fold the whipped cream into the cream cheese mixture until combined.
Step 4: Add Gelatin to the Filling
Once the gelatin mixture has cooled slightly, gently fold it into the cream cheese mixture. This will help set the filling.
Step 5: Color the Cheesecake Filling
Divide the cheesecake filling into separate bowls, depending on how many colors you want. Add a few drops of gel food coloring to each bowl and stir until the desired color is achieved.
Step 6: Assemble the Cheesecakes
Layer the different colored cheesecake fillings into each muffin cup or mini cheesecake pan. Start with one color and add it in spoonfuls, gently pressing it into the crust. Continue layering with the different colors. Once all layers are added, smooth the top with a spatula.
Step 7: Chill the Cheesecakes
Place the cheesecakes in the refrigerator for at least 4 hours, or overnight, to set completely.
Step 8: Decorate
Once the cheesecakes are set, top each one with a dollop of whipped cream, candy eggs, and sprinkles for a festive touch.
Tips for Making the Recipe
- Ensure that your cream cheese is at room temperature for a smooth filling.
- Use gel food coloring rather than liquid food coloring to avoid altering the texture of the cheesecake filling.
- If you don’t have mini cheesecake pans, you can use muffin tins lined with cupcake liners.
- If you’re making the cheesecake ahead of time, be sure to refrigerate them long enough for the gelatin to set properly.
How to Serve
These Easter No-Bake Mini Cheesecakes are best served chilled. Arrange them on a festive platter and serve them as a sweet finale to your holiday meal. They make a beautiful centerpiece for your Easter dessert table.
Make Ahead and Storage
Storing Leftovers
Store leftover mini cheesecakes in an airtight container in the refrigerator for up to 3-4 days. These cheesecakes are best when fresh but will still maintain their delicious flavor and texture for a few days.
Freezing
If you’d like to make them in advance for future use, these cheesecakes can be frozen. Once set, remove them from the pans and wrap them tightly in plastic wrap and foil. Freeze for up to 1-2 months. Thaw overnight in the refrigerator before serving.
Reheating
These cheesecakes are served cold, so there’s no need for reheating. Simply take them out of the fridge and let them sit for a few minutes before serving if you prefer them at a slightly warmer temperature.
FAQs
1. Can I use a different type of cookie for the crust?
Yes! Graham crackers or even chocolate cookies work great as an alternative to shortbread cookies.
2. Can I skip the gelatin?
Gelatin is used to set the cheesecake filling, but if you prefer a softer filling, you can omit it. However, the cheesecake may be less firm.
3. Can I use a different color scheme for the layers?
Absolutely! Feel free to customize the colors to match your theme or personal preference.
4. Can I make this recipe dairy-free?
Yes, you can use non-dairy cream cheese and a plant-based whipped cream substitute for a dairy-free version.
5. How long do these mini cheesecakes take to set?
The cheesecakes need to chill in the refrigerator for at least 4 hours, but overnight is ideal for the best results.
6. Can I add fresh fruit to the top?
Yes, fresh fruit like strawberries, blueberries, or raspberries would make a delicious topping for these mini cheesecakes.
7. How can I make the crust crunchier?
For a crunchier crust, you can bake the shortbread crust for about 10 minutes at 350°F (175°C) before adding the cheesecake filling.
8. Can I make these cheesecakes in advance?
Yes! These cheesecakes can be made up to two days in advance, making them an excellent make-ahead dessert.
9. How do I prevent cracks in the cheesecake?
Since these are no-bake cheesecakes, cracking isn’t an issue. Just make sure to chill them properly to ensure they set firmly.
10. Can I make these in a single pan instead of mini sizes?
You can make this recipe in a 9-inch springform pan instead of mini cheesecakes. Just be sure to adjust the chilling time accordingly.
Conclusion
These Easter No-Bake Mini Cheesecakes are a delightful, easy-to-make treat that will impress your guests and make your holiday celebrations even sweeter. With a rich and creamy filling, colorful layers, and festive decorations, these cheesecakes are the perfect dessert to add a touch of whimsy and flavor to your Easter table.
Print
Easter No-Bake Mini Cheesecakes
- Total Time: 4 hours 15 minutes
- Yield: 12 mini cheesecakes 1x
- Diet: Vegetarian
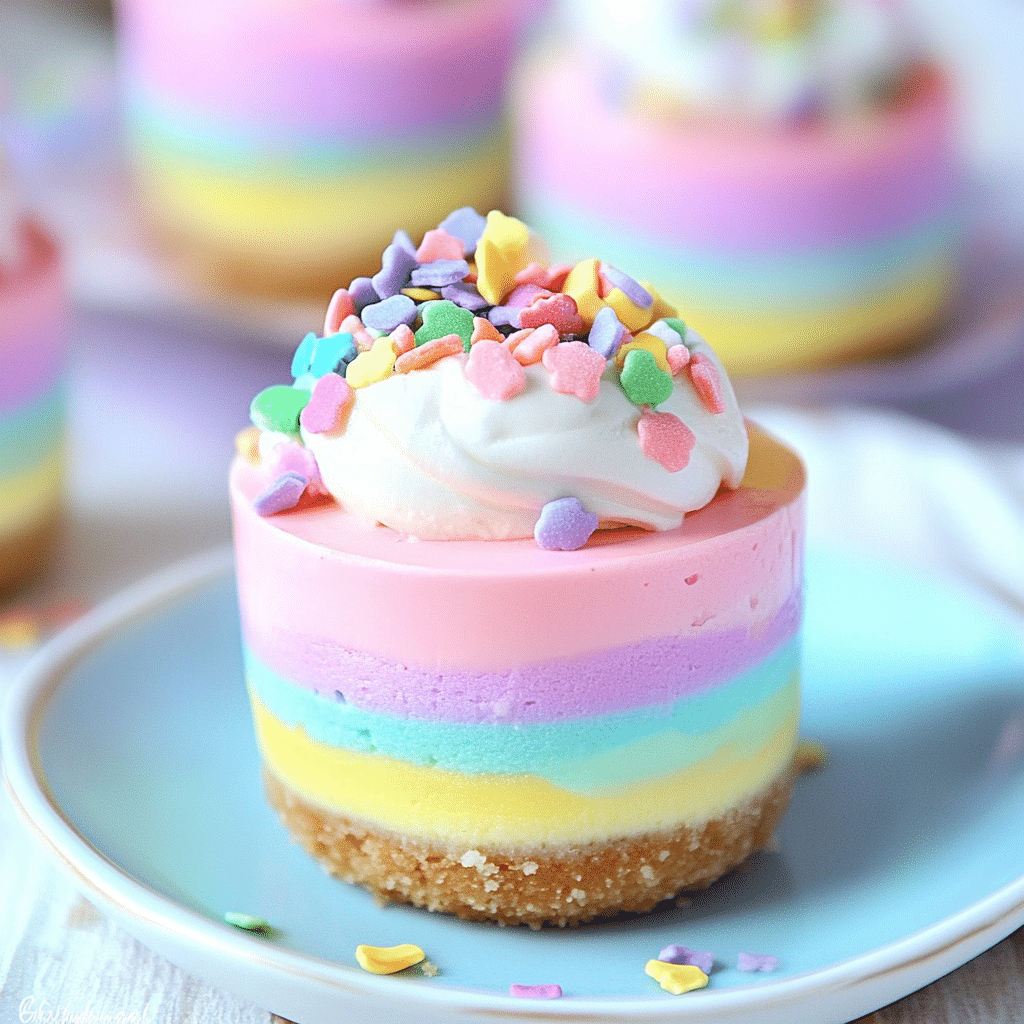
Description
These Easter No-Bake Mini Cheesecakes are the perfect treat for a festive spring celebration. With a buttery shortbread cookie crust and a creamy, tangy cheesecake filling, these mini cheesecakes are easy to make and sure to impress. Decorated with whipped cream, candy eggs, and sprinkles, they are as delightful to look at as they are to eat. No baking required—just chill, and you’re ready to enjoy!
Ingredients
For the Crust:
-
6 oz shortbread cookies (approx. 12 round cookies)
-
½ oz unsalted butter (1 tbsp), melted
For the Cheesecake Filling:
-
2 tbsp cold water
-
1 packet unflavored powdered gelatin (¼ oz or 2.5 tsp)
-
1 lb cream cheese, full-fat, at room temperature
-
3.5 oz granulated sugar (½ cup)
-
½ tsp lemon juice
-
1 tsp vanilla bean paste (or substitute with vanilla extract)
-
Pinch of salt
-
1 cup heavy cream, at room temperature
For Decoration:
-
Assorted gel food coloring (4 colors recommended; Americolor brand is great)
-
½ cup whipped cream, to decorate
-
Candy eggs, to decorate
-
Sprinkles, to decorate
Instructions
Make the Crust:
-
In a food processor or by hand, crush the shortbread cookies into fine crumbs.
-
Combine the cookie crumbs with melted butter, mixing until the mixture holds together when pressed.
-
Press the mixture into the bottom of mini cheesecake pans or silicone molds, creating an even crust. Chill in the refrigerator while preparing the filling.
Make the Cheesecake Filling:
-
In a small bowl, add cold water and sprinkle the powdered gelatin over it. Let it sit for 5 minutes to bloom.
-
Once bloomed, gently heat the gelatin in the microwave for 10–15 seconds until fully dissolved. Set aside to cool.
-
In a large mixing bowl, beat the cream cheese with an electric mixer until smooth and creamy.
-
Add the granulated sugar, lemon juice, vanilla bean paste, and salt, and continue to mix until well combined.
-
In a separate bowl, beat the heavy cream until soft peaks form.
-
Gradually fold the whipped cream into the cream cheese mixture, being careful not to deflate the cream.
-
Add the cooled gelatin mixture to the cheesecake filling and mix until fully incorporated.
Assemble the Mini Cheesecakes:
-
Spoon the cheesecake filling evenly into each mini cheesecake mold, on top of the chilled crust. Smooth the tops with a spatula.
-
Cover and refrigerate for at least 4 hours, or until fully set (overnight is best).
Decorate the Cheesecakes:
- Once the cheesecakes are set, remove them from the molds and place them on serving plates.
-
Divide the whipped cream into small bowls and add different food coloring to each bowl.
-
Pipe or spoon the colored whipped cream on top of each cheesecake, creating beautiful swirls or layers.
-
Top with candy eggs and sprinkles to complete the festive look.
Notes
-
Gelatin is essential to help the cheesecakes set without baking. Be sure to fully dissolve it before adding it to the filling.
-
If you don’t have mini cheesecake molds, silicone cupcake liners work great as an alternative.
- Feel free to get creative with the food coloring and decorations for a personalized touch.
- Prep Time: 15 minutes
- Cook Time: 0 minutes
- Category: Dessert
- Method: No-Bake
- Cuisine: American