
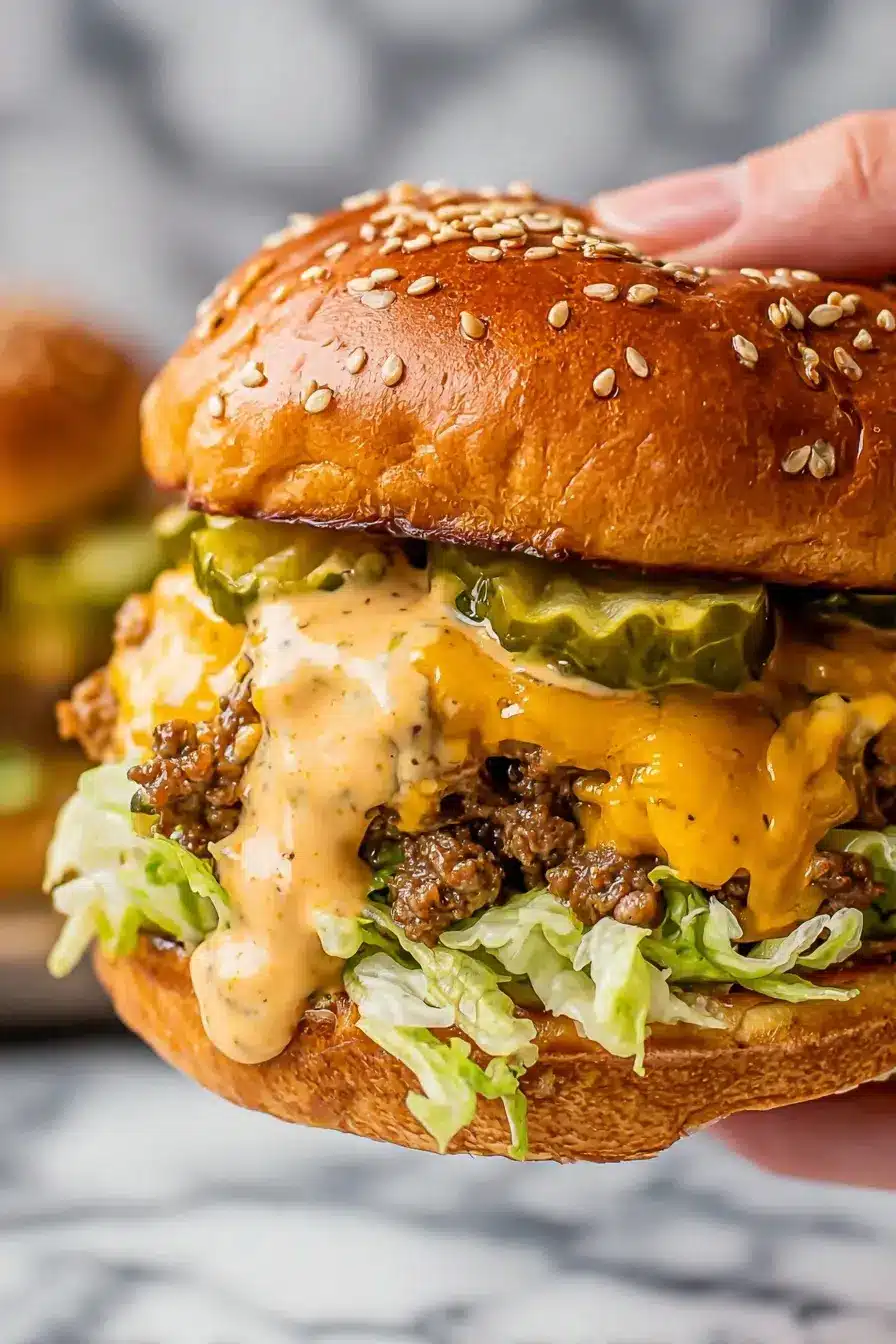
Learn how to make Special Sauce Beef and Cheese Sliders with savory ground beef, melted American cheese, and fresh toppings on soft Hawaiian rolls for a perfect group meal.
When it comes to hosting a crowd or simply treating the family to a comforting weekend dinner, few dishes hit the mark quite like Special Sauce Beef and Cheese Sliders. These bite-sized sandwiches offer a sophisticated balance of classic burger elements, reimagined for maximum efficiency and flavor. I, Carmen Maria Márquez, have found that the secret to a memorable slider isn’t just the meat, but the harmony between the warm, savory base and the crisp, cold toppings added at the very end.
These sliders are inspired by the iconic flavor profiles of legendary American drive-ins, yet they utilize modern techniques to ensure the bread remains light and the meat stays juicy. By using a connected slab of rolls, you can prepare a dozen portions simultaneously, making it a smart investment of your time in the kitchen. This method allows you to focus on the quality of your ingredients rather than flipping individual patties over a hot stove.
As you dive into this guide, you will discover why this specific assembly method has become a favorite for those seeking high-performance results with minimal stress. From the selection of the beef to the specific rest time required for the perfect slice, every step is designed to elevate a humble slider into a premium value meal. Let’s explore how to create this crowd-pleasing favorite on homemademenus.com.
Overview of Special Sauce Beef and Cheese Sliders
Flavor profile and inspiration
The flavor profile of these sliders is a nostalgic tribute to the classic American cheeseburger. You get the richness of seasoned beef paired with the mild, creamy melt of American cheese, all encased in a slightly sweet bun. This combination is elevated by a “special sauce” that provides a tangy, savory, and slightly sweet kick, reminiscent of the most famous burger chains in the United States.
Inspiration for this dish comes from the desire to recreate that “secret sauce” magic at home while adapting the format for modern entertaining. By focusing on a balance of acidity from the pickles and richness from the beef, these sliders provide a high quality tasting experience that feels both familiar and indulgent. The sweetness of the Hawaiian rolls acts as a bridge, connecting the salty and savory elements into one cohesive bite.
Benefits of the slab baking method
One of the primary advantages of the slab baking method is the sheer efficiency it provides for the home cook. Instead of forming and cooking twelve individual patties, you season and bake the ground beef as a single, uniform layer. This ensures that every slider has an equal distribution of meat and cheese, creating a sophisticated solution for batch cooking without sacrificing consistency.
Furthermore, baking the meat within the rolls allows the juices to lightly toast the bottom of the bread without making it greasy. This method also keeps the rolls connected during the initial bake, which helps retain heat and moisture within the beef. For those looking for strategic opportunities to save time during a busy party, the slab method is an absolute game-changer in the kitchen.
Texture contrast and fresh ingredients
The hallmark of a great slider is the interplay between different textures. These Special Sauce Beef and Cheese Sliders prioritize a contrast between the hot, baked beef and the cold, crisp toppings. By adding shredded iceberg lettuce and chilled pickles after the baking process, you prevent the greens from wilting and the pickles from losing their snap.
Using fresh ingredients is a long-term value for your health and the overall success of the recipe. The softness of the Hawaiian roll, the gooeyness of the melted cheese, and the crunch of the fresh produce create a multi-dimensional eating experience. This attention to detail ensures that the meal feels vibrant and homemade, rather than something pulled from a fast-food heat lamp.
Essential Ingredients for the Slider Base
Choosing 80/20 ground beef
For the best results, selecting 80/20 ground beef is essential for achieving the necessary richness and moisture. The 20% fat content ensures that the meat remains juicy during the baking process, preventing the sliders from becoming dry or crumbly. This ratio is widely considered the gold standard for burgers and sliders across the country because it provides a premium materials foundation for the dish.
When the beef is baked as a slab, the fat helps to brown the meat evenly while infusing it with deep, beefy flavor. It is important to drain any excess rendered fat after the initial browning or baking of the meat to ensure the bottom rolls don’t become overly saturated. Using high-quality beef is a smart investment in the final taste and texture of your sliders.
Selecting soft Hawaiian rolls
The choice of bread is critical, and Hawaiian rolls are the preferred option for this recipe. Their signature sweetness and pillowy texture complement the savory beef and tangy sauce perfectly. Because they come in a connected slab, they are structurally ideal for the slab-baking technique used on homemademenus.com.
When selecting your rolls, ensure they are fresh and soft to the touch. The slight sugar content in the dough helps the tops of the rolls caramelize beautifully when brushed with butter and baked. These rolls have become a staple for American sliders because they hold up well to fillings while remaining easy to bite through, offering exclusive options for various flavor pairings.
Seasoning with onion powder and salt
Simplicity is key when seasoning the beef base. Onion powder provides a consistent, savory depth that permeates the entire meat slab without the texture of chopped raw onions. When combined with kosher salt, it enhances the natural flavors of the beef, ensuring that the base is well-seasoned even before the special sauce is applied.
Applying the seasoning evenly across the meat is vital for a high-performance flavor profile. You want every guest to enjoy the same seasoned perfection in every bite. Using kosher salt allows for better control over the saltiness, as the larger grains are easier to pinch and distribute than fine table salt. This foundational seasoning step sets the stage for the more complex flavors to come.
Preparing the Special Sauce Beef and Cheese Sliders
Slicing the roll slab horizontally
To begin the assembly, you must slice the entire slab of Hawaiian rolls horizontally. The goal is to create one large top piece and one large bottom piece, keeping all the individual rolls connected to each other. This is best achieved using a long serrated bread knife, which allows for a clean, even cut through the soft dough.
Maintain a steady hand to ensure the thickness is consistent across the entire slab. If the cut is uneven, some sliders may end up with too much bread while others have too little. Keeping the rolls connected at this stage is a sophisticated solution for handling multiple servings at once, a technique frequently recommended on homemademenus.com for party prep.
Layering the seasoned ground beef
Once the rolls are sliced, the cooked and seasoned ground beef is spread in an even layer over the bottom half of the rolls. It is helpful to press the meat down slightly with a spatula to create a compact, sturdy layer. This prevents the meat from falling out when the sliders are eventually sliced into individual portions.
The beef should reach the very edges of the roll slab to ensure that the corner sliders are just as meaty as the center ones. This edge-to-edge coverage is a hallmark of high quality slider preparation. By layering the meat while it is still warm, you begin the process of warming the bottom bun, which helps the flavors meld together during the final bake.
Adding American cheese slices
After the beef is in place, cover the entire surface with slices of American cheese. American cheese is favored for this recipe because of its superior melting point and creamy texture. It creates a smooth, velvety layer that acts as a “glue,” helping to hold the beef in place once it is melted.
For a truly premium value presentation, slightly overlap the cheese slices so there are no gaps. As the cheese melts in the oven, it will drape over the sides of the beef, creating a delicious and visual appeal. This step is crucial for achieving that classic cheeseburger taste that American diners crave, making it a strategic opportunity to maximize flavor impact.
Disclosure: This post contains affiliate links.If you click and make a purchase, I may earn a small commission at no extra cost to you.



Creating the Creamy Special Sauce
Mayonnaise and mustard foundation
The “special” in special sauce comes from its creamy, tangy base. Starting with high-quality mayonnaise provides the richness and body needed to carry the other flavors. Yellow mustard is then whisked in to provide a sharp, vinegary punch that cuts through the fat of the beef and cheese, offering a high-performance flavor balance.
This foundation is the secret to the sauce’s smooth consistency. When these two ingredients are combined in the right proportions, they create a pale orange hue that is instantly recognizable. Using brand-name condiments can be a smart investment here, as the quality of the base directly affects the final taste of the sauce used on homemademenus.com recipes.
Incorporating dill pickle relish
To give the sauce its characteristic texture and “zip,” dill pickle relish is stirred into the mayo-mustard mixture. The relish provides small bursts of acidity and crunch in every bite, which is essential for mimicking the classic burger sauces of famous American eateries. It transforms a simple spread into a sophisticated solution for flavoring beef.
Be sure to use dill relish rather than sweet relish if you want to maintain a more savory profile. The vinegar from the relish also helps to thin the sauce slightly, making it easier to spread over the warm sliders. This ingredient is a long-term value addition to any burger enthusiast’s pantry, as it stays fresh in the fridge and adds instant character to many dishes.
Balancing flavors with sugar and vinegar
While the mustard and relish provide acidity, a small amount of sugar and additional white vinegar are used to fine-tune the flavor profile. The sugar rounds out the sharp edges of the vinegar, creating a “sweet and sour” effect that is highly addictive. This balancing act is what separates a mediocre sauce from a premium materials condiment.
Adjusting these elements to your personal preference allows for exclusive options in the final taste. Some prefer a tangier sauce, while others enjoy a bit more sweetness to complement the Hawaiian rolls. Taking the time to taste and adjust the sauce ensures that your Special Sauce Beef and Cheese Sliders are perfectly tailored to your guests’ palates.
Spicing with paprika and garlic powder
The final touch for the sauce involves adding paprika and garlic powder. The paprika provides a subtle smokiness and contributes to the iconic orange color, while the garlic powder adds a savory, aromatic depth that lingers on the tongue. These spices are high quality essentials that elevate the sauce from a basic condiment to a gourmet topping.
Ensure the spices are whisked in thoroughly so there are no clumps. The result should be a smooth, speckled sauce that looks as good as it tastes. This attention to detail in the spice blend is a strategic opportunity to impress your guests with a flavor that tastes professional and well-developed.
Achieving a Golden Buttery Sesame Topping
Preparing melted unsalted butter
To achieve the perfect golden crust on your sliders, you must brush the tops of the rolls with melted unsalted butter. Using unsalted butter is a smart investment because it allows you to control the exact amount of saltiness on the exterior of the bread. When the butter hits the warm rolls in the oven, it creates a rich, toasted flavor that is irresistible.
Melt the butter gently to avoid browning it before it even reaches the rolls. A pastry brush is the best tool for this job, ensuring that every inch of the Hawaiian roll slab is coated. This buttery coating not only adds flavor but also helps the seeds and salt adhere to the surface, providing high-performance results in terms of both taste and appearance.
Applying multicolored sesame seeds
For a premium value presentation, use a mix of white and black sesame seeds. The contrast of colors against the golden-brown rolls makes the sliders look like they came from a high-end bistro. Beyond the visual appeal, sesame seeds provide a nutty flavor and a delicate crunch that enhances the overall texture of the dish.
Sprinkle the seeds generously while the butter is still wet. This ensures they stay in place during the baking and slicing process. This small addition is a strategic opportunity to elevate the dish’s aesthetic, making it perfect for social media sharing or impressing guests at a potluck gathered via homemademenus.com.
Finishing with a pinch of salt
The final step before the rolls go into the oven is a light sprinkling of kosher salt over the buttered tops. This enhances the sweetness of the Hawaiian rolls and the richness of the butter, creating a “salted butter” effect that is incredibly savory. It is a sophisticated solution for adding one more layer of flavor to the very first part of the slider that hits the palate.
Use a light hand with the salt, as the beef and cheese already contain sodium. The goal is to provide a subtle sparkle of flavor rather than an overwhelming saltiness. This attention to the “finish” of the dish is a long-term value for any cook looking to master the art of the perfect slider.
Baking the Special Sauce Beef and Cheese Sliders
Maintaining the connected bread slab
During the baking process, it is important to keep the roll slab connected. This helps the rolls steam slightly from the inside, keeping them soft, while the outside becomes crisp and golden. Baking them as a single unit also makes it easier to monitor the progress of the entire batch at once, ensuring high quality consistency.
Place the slab in a baking dish that fits it snugly. This prevents the rolls from spreading out too much and helps maintain the height of the sliders. Keeping the integrity of the slab is a strategic opportunity to ensure that the heat is distributed evenly across all twelve portions simultaneously.
Monitoring the melting of American cheese
The sliders only need a few minutes in a preheated oven to reach perfection. You are looking for the American cheese to become completely melted and start to drape over the sides of the beef. This visual cue tells you that the interior is hot and the bread is sufficiently toasted, offering high-performance timing for the busy cook.
Keep a close eye on the oven, as the sugar in the Hawaiian rolls can cause them to brown quickly. If the tops are browning too fast before the cheese is fully melted, you can loosely tent the dish with aluminum foil. This sophisticated solution allows the cheese to continue melting without burning the delicate bread.
Proper heat for the beef filling
Since the beef is already cooked before assembly, the goal of baking is to bring the meat back up to a serving temperature and meld it with the cheese. A moderate oven temperature (around 350°F) is ideal for this task. It provides enough heat to melt the cheese and toast the buns without drying out the beef, a premium materials approach to slider prep.
Using a pre-heated oven ensures that the cooking time is minimized, which helps preserve the moisture in the rolls. The result is a hot, savory center that contrasts beautifully with the cold toppings you will add next. Following these steps on homemademenus.com guarantees a professional result every time.
Preparing Fresh Produce and Cold Layers
Shredding and chilling iceberg lettuce
The key to the “fresh” side of these sliders is finely shredded iceberg lettuce. Iceberg is chosen for its high water content and superior crunch, which provides a cooling sensation against the hot beef. For the best results, shred the lettuce just before serving and keep it in the refrigerator until the very last moment, ensuring a high quality texture.
Chilled lettuce stays crisp longer even when placed on a warm sandwich. This strategic opportunity to add texture is often overlooked but is vital for the authentic “special sauce burger” experience. Shredding it finely allows it to be distributed evenly across the slab, so no single bite is overwhelmed by a large leaf.
Drying dill pickle chips
Pickle chips add a necessary briny acidity to the sliders, but they can also introduce unwanted moisture. To prevent the rolls from becoming soggy, pat the pickle chips dry with a paper towel before adding them to the assembly. This smart investment of a few seconds ensures that the bread remains firm and the flavor remains concentrated.
Using crinkle-cut dill pickles adds even more surface area for the sauce to cling to. Drying them also helps them stay in place on the slippery layer of special sauce. This sophisticated solution for managing moisture is a hallmark of professional sandwich making, as taught on homemademenus.com.
Keeping cold components separate
Until the sliders are out of the oven and have rested slightly, keep the sauce, lettuce, and pickles separate and cold. This separation is a long-term value technique that preserves the integrity of each ingredient. Adding cold toppings to a hot sandwich just before eating creates a dynamic temperature contrast that is highly satisfying.
If you were to bake the lettuce or pickles, they would lose their structure and become mushy. By keeping them chilled, you maintain the premium value of the fresh produce. This method ensures that every slider served is of the highest standard, with each component playing its specific role perfectly.
Assembling the Special Sauce Beef and Cheese Sliders
Applying sauce after the oven
Once the rolls are out of the oven and the cheese is melted, carefully lift the top slab of rolls. Spread a generous layer of the prepared creamy special sauce over the melted cheese. Applying the sauce after baking prevents it from breaking or becoming oily under the high heat of the oven, a high-performance assembly tip.
The warmth from the beef will slightly warm the sauce, releasing its aromatics without changing its creamy texture. This step is where the sliders truly come to life, as the sauce mingles with the savory beef and salty cheese. This is the strategic opportunity to ensure the flavor is bold and present in every bite.
Layering crisp chilled lettuce
Immediately after the sauce, pile on the shredded iceberg lettuce. The sauce acts as a “glue” to hold the lettuce in place, preventing it from sliding out when the sandwiches are eaten. This layer should be thick enough to provide a noticeable crunch but not so thick that it makes the slider difficult to handle, offering a sophisticated solution for balance.
The cold lettuce against the hot cheese creates a sensation that is a hallmark of great American burgers. By following this order of assembly on homemademenus.com, you ensure that the lettuce stays as fresh as possible. This attention to layering order is a premium materials approach to sandwich construction.
Adding briny dried pickles
The final internal layer consists of the dried pickle chips. Place them evenly across the bed of lettuce so that every individual slider receives two or three chips. This ensures a consistent distribution of that briny, vinegary pop that complements the sweet Hawaiian rolls so well, providing exclusive options for flavor depth.
Once the pickles are in place, gently set the top slab of rolls back onto the assembly. The weight of the rolls will lightly compress the layers, helping them stay together. This completed assembly represents a smart investment in culinary technique, resulting in a slider that is structurally sound and bursting with flavor.
Techniques to Prevent Soggy Slider Rolls
Impact of chilled toppings on bread
Adding cold toppings like lettuce and sauce to a warm bun can sometimes lead to sogginess if not handled correctly. The moisture from the cold items can condense on the warm bread. However, by using the slab method and toasting the rolls beforehand, you create a high-performance barrier that helps the bread stay firm.
The melted cheese also acts as a protective layer, preventing the juices from the meat and the moisture from the sauce from soaking directly into the bottom bun. This sophisticated solution is why American cheese is so effective in this recipe. Understanding the science of moisture management is a long-term value for any home cook using homemademenus.com.
Drying ingredients thoroughly
As mentioned previously, drying the pickles is non-negotiable for a high quality result. Similarly, if you wash your lettuce, ensure it is spun completely dry in a salad spinner or patted down with towels. Any excess water will immediately migrate to the bread, compromising the texture of the slider.
This attention to detail is a smart investment of effort that pays off in the final mouthfeel of the dish. A soggy slider is a common pitfall, but it is entirely avoidable with these simple drying techniques. By prioritizing the structural integrity of the Hawaiian rolls, you ensure a premium value eating experience.
Proper assembly timing
The best way to prevent sogginess is to assemble the cold layers and slice the sliders immediately before serving. Do not let the assembled sliders sit for long periods, as the moisture will eventually win. This strategic opportunity to serve them fresh is what makes them such a hit at parties.
If you need to prepare things in advance, keep the baked meat/cheese slab and the cold toppings separate until the very last minute. This exclusive options for “just-in-time” assembly is the secret used by professional caterers. Serving them right away guarantees that the contrast between the hot base and cold toppings is at its peak.
Resting and Slicing the Slider Slab
The importance of a two-minute rest
After the sliders are fully assembled, allow the entire slab to rest for about two minutes before slicing. This short period allows the cheese to set slightly and the sauce to settle into the crevices of the meat. It is a sophisticated solution that prevents the fillings from squishing out when the knife passes through.
Resting the meat is a standard culinary practice that ensures juices are redistributed, but for sliders, it’s also about structural stability. This high-performance pause in the process makes the final slicing much cleaner. Patience here is a smart investment for a beautiful final presentation on your serving platter.
Keeping layers intact during cutting
To keep the layers intact, use a sharp serrated knife or a very sharp chef’s knife. Use a gentle sawing motion rather than pressing straight down, which can crush the soft rolls and push the fillings out the sides. This technique ensures that each slider remains a perfect, self-contained unit of high quality flavor.
Hold the top of the slab firmly but gently with your free hand as you cut. By following the natural indentations of the rolls, you can quickly divide the slab into twelve perfect portions. This strategic opportunity for clean cuts makes the dish look as professional as anything you would find in a high-end restaurant featured on homemademenus.com.
Tools for clean slider portions
While a serrated knife is the primary tool, a sturdy spatula is also helpful for lifting the individual sliders out of the baking dish. A premium materials spatula with a thin, flexible edge can slide under the bottom bun without tearing it. This ensures that the toasted bottom remains attached to the rest of the sandwich.
If you are serving these at a large event, having the right tools ready is a long-term value for efficient service. Clean portions make for easier eating and a more organized buffet line. Investing in a good bread knife and spatula is a smart investment for anyone who loves hosting slider-themed gatherings.
Serving Suggestions for Special Sauce Beef and Cheese Sliders
Pairing with crunchy salad bowls
To balance the richness of the beef and cheese, serve these sliders alongside a crunchy green salad. A mix of romaine, cucumbers, and a light vinaigrette provides a refreshing counterpoint to the savory sliders. This pairing offers exclusive options for a complete, well-rounded meal that doesn’t feel too heavy.
A classic coleslaw is another excellent choice, as its creaminess complements the special sauce while adding its own unique crunch. These sophisticated solutions for side dishes help to stretch the meal and provide variety for your guests. You can find many salad inspirations on homemademenus.com that pair perfectly with beef.
Adding Parmesan garlic potato wedges
For a more indulgent side, Parmesan garlic potato wedges are a high-performance partner for sliders. The salty, herbal notes of the potatoes enhance the savory flavors of the beef. Since both the sliders and the wedges can be prepared in the oven, it makes for a very efficient cooking process.
The wedges provide a more substantial side that turns the sliders into a hearty dinner. This combination is a premium value favorite for family game nights or casual get-togethers. The contrast between the soft slider and the crispy potato is a strategic opportunity to satisfy everyone at the table.
Presenting hot from the pan
Presentation matters, and serving the sliders directly from a beautiful ceramic baking dish or a rustic wooden board adds to the “homemade” charm. Keeping them close together helps retain their heat, ensuring that the last person in line still gets a warm slider. This long-term value in presentation elevates the dining experience.
Garnish the serving area with a few extra pickles or a small bowl of the special sauce for those who want an extra dip. This high quality touch shows your guests that you have considered every detail of their meal. A well-presented tray of sliders is always a conversation starter at any American gathering.
Entertaining with Batch-Cooked Sliders
Portions for potluck gatherings
When attending a potluck, sliders are a smart investment because they are easy to transport and even easier to serve. One or two slabs of twelve can feed a large group without requiring a lot of space. They are the ultimate finger food, allowing guests to mingle while they eat, a strategic opportunity for social events.
Because they are pre-sliced, guests can easily grab one and move on, reducing the need for plates and silverware. This sophisticated solution for group dining is why sliders are a staple of American party culture. Bringing a dish from homemademenus.com ensures you are bringing a crowd favorite.
Managing crowds without a skillet
One of the biggest challenges of cooking for a crowd is the limited space on a stovetop. By using the oven for the slider base, you free up your burners for other tasks or simply keep your kitchen cooler. This high-performance workflow is essential for hosting large holiday parties or summer cookouts.
The oven does the heavy lifting, allowing you to prepare multiple batches in sequence if needed. This long-term value in kitchen management means you spend less time cooking and more time enjoying your guests’ company. It is a premium materials approach to modern entertaining that emphasizes ease and efficiency.
Efficient main dish preparation
Ultimately, Special Sauce Beef and Cheese Sliders are about providing a high quality main dish with minimal effort. The combination of pre-cooked beef, a single baking step, and fresh assembly makes it one of the most efficient recipes in your repertoire. It is a premium value meal that doesn’t demand hours of labor.
Whether you are a seasoned cook like Carmen Maria Márquez or a beginner, this recipe offers exclusive options for customization and success. By following the techniques outlined on homemademenus.com, you can confidently serve a meal that is both delicious and impressive. Enjoy the process of creating a classic American favorite that everyone will love.
