
Soft, chewy vanilla with crisp chocolate swirls and a buttery center is exactly what makes Marble Pinwheel Cookies so hard to stop eating. This classic slice-and-bake treat offers a striking visual appeal without requiring advanced decorating skills, making it a favorite for both novice and experienced bakers. From homemademenus.com.
These cookies take about 20 minutes to prep, followed by a necessary chilling period, yielding approximately 24 beautiful spirals. I like to keep a log of this dough in the freezer for unexpected guests or late-night cravings. Carmen Maria Márquez once mentioned that the key to a professional look is ensuring both dough layers are chilled to the same temperature before rolling.
The hypnotic pattern of these cookies makes them the star of any dessert table or gift box. If you have been looking for a recipe that balances deep cocoa notes with a classic sugar cookie base, you have found the perfect match.
Why This Recipe Is a Keeper
What Makes It Special
The texture of these cookies is uniquely satisfying because it combines a tender, melt-in-your-mouth crumb with the slight snap of the outer edges. By using a balanced ratio of butter to flour, we ensure the cookies hold their shape during the baking process without becoming overly hard or brittle.
This recipe provides a high premium value for home bakers because it utilizes basic ingredients to create a luxury-tier aesthetic. The contrast between the dark cocoa and the pale vanilla dough creates a sophisticated presentation that rivals expensive boutique bakeries.
- Soft texture: The dough remains pliable and bakes into a delicate, tender bite.
- Quick method: Once the dough is chilled, you simply slice and bake for instant results.
- Bold flavor: High-quality vanilla extract and rich cocoa powder provide a deep, complex taste profile.
- Great yield: This recipe produces a large batch, offering premium value for holiday cookie swaps.
Ingredients: What You’ll Need
Key Ingredients
It is essential to use exact measurements and room-temperature ingredients to ensure the two doughs have an identical consistency. Discrepancies in dough thickness can cause the pinwheels to separate or bake unevenly in the oven.
Investing in high quality unsalted butter and fresh baking powder is the best way to guarantee a superior rise and a rich, creamy flavor. Using top-tier cocoa will also ensure your chocolate swirls are dark, vibrant, and full of authentic chocolate essence.
- 2 1/2 cups all-purpose flour: Provides the structural foundation for the cookie dough.
- 1 tsp baking powder: Ensures a light, slightly lifted texture that isn’t too dense.
- 1/4 tsp salt: Enhances the sweetness and balances the bitterness of the cocoa.
- 1 cup unsalted butter, softened: Creates a rich, buttery base and a tender crumb.
- 3/4 cup granulated sugar: Provides sweetness and helps the edges crisp up beautifully.
- 1 large egg: Acts as the binding agent to hold the dough together.
- 2 tsp vanilla extract: Adds a warm, aromatic depth to the vanilla portion of the dough.
- 2 tbsp cocoa powder: Provides the rich chocolate flavor and dark color for the contrast.
- 1-2 tbsp milk: Adjusts the chocolate dough’s moisture to match the vanilla dough.
How to Make Marble Pinwheel Cookies
Step-by-Step
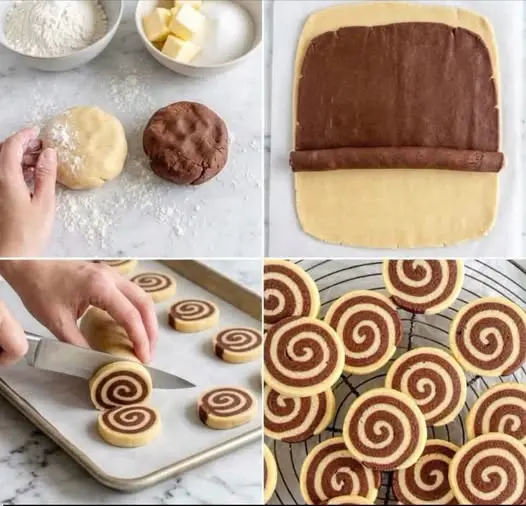
Creating the perfect swirl requires a gentle hand and a bit of patience during the rolling phase. The goal is to create tight, even layers that bond together without air pockets forming between the chocolate and vanilla.
We use a low and slow baking temperature to prevent the cookies from browning too quickly, which preserves the clean color contrast. This methodical approach ensures that the final product looks just as good as it tastes once it leaves the oven.
Disclosure: This post contains affiliate links.If you click and make a purchase, I may earn a small commission at no extra cost to you.



- Prep: Preheat your oven to 170°C (340°F) and line a large baking tray with parchment paper.
- Dry Mix: In a medium bowl, whisk together the flour, baking powder, and salt until combined.
- Creaming: In a separate large bowl, cream the softened butter and sugar until the mixture is light and fluffy.
- Combine: Beat in the egg and vanilla extract until the mixture is smooth and well combined.
- Form Dough: Gradually add the dry ingredients to the wet mixture, mixing until a soft dough forms.
- Divide: Divide the dough into two equal portions and place them into separate bowls.
- Flavor: Leave one portion plain; mix the cocoa powder and milk into the second portion until uniform.
- Roll: Roll each dough portion into a rectangle of equal size, about 1/4 inch (6 mm) thick, between sheets of wax paper.
- Stack: Place the chocolate dough rectangle directly on top of the vanilla dough and press gently.
- Roll Log: Starting from one long edge, roll the dough tightly into a log and wrap it in plastic.
- Chill: Chill the log in the refrigerator for 30 to 60 minutes until it is firm enough to slice.
- Slice: Slice the log into 1/4-inch (6 mm) thick rounds and place them on the prepared tray.
- Bake: Bake for 10 to 12 minutes, or until the edges are just barely golden.
- Cool: Let the cookies rest on the tray for 5 minutes before moving them to a wire rack.
My Best Tips
Pro Tips
One helpful tip from Carmen Maria Márquez is to use a piece of unscented dental floss to slice the dough log for perfectly round shapes. This technique prevents the dough from being squashed, which can happen when using a traditional kitchen knife.
When measuring your flour, always use the spoon-and-level method rather than scooping directly from the bag. Scooping packs the flour down, which can lead to dry, crumbly cookies that don’t roll easily into the signature pinwheel shape.
- Chill thoroughly: If the dough is too soft, the layers will smear instead of forming a clean spiral.
- Uniform thickness: Use a rolling pin with thickness rings to ensure both dough rectangles are identical.
- Cold surface: Roll your dough on a cool countertop to prevent the butter from melting too quickly.
Easy Variations
Simple Twists
While the classic chocolate and vanilla combination is hard to beat, you can easily customize this recipe for different occasions. Adding seasonal spices or citrus zests can transform the flavor profile without changing the fundamental structure of the dough.
I highly encourage experimenting with different extracts to create a unique flavor signature for your household. A small change in the flavoring can make these cookies feel like a brand-new recipe every time you bake them.
- Peppermint Swirl: Replace vanilla with peppermint extract and add red food coloring to the plain dough.
- Mocha Pinwheels: Add a teaspoon of espresso powder to the chocolate portion for a coffee kick.
Fixing Common Issues
Troubleshooting
If your dough begins to crack while you are rolling it into a log, it may be too cold or too dry. Simply let it sit at room temperature for five minutes or lightly dampen your fingers with water to smooth out any visible fissures.
In cases where the two dough layers are not sticking together, you can lightly brush the vanilla layer with a tiny amount of milk before placing the chocolate layer on top. This acts as a food-safe glue to keep the spiral intact during the slicing process.
- Dough crumbling: Add an extra teaspoon of milk to bring the moisture level up.
- Blurry swirls: Ensure the log is very cold before slicing to maintain the sharp lines.
How to Serve
Serving Ideas
Serve these cookies warm with a tall glass of cold milk or a hot cup of coffee for the ultimate afternoon treat. They are durable enough to be stacked, making them excellent for lunchboxes or as a sweet addition to a charcuterie-style dessert board.
These treats pair exceptionally well with Shortbread textures and improve when you have some background Chocolate knowledge to appreciate the cocoa quality. They are best enjoyed within a few days of baking for the freshest texture.
Storage
Make Ahead
Proper storage is the key to maintaining the delicate texture of these cookies over several days. Because they have a high butter content, they can absorb odors from the refrigerator, so airtight containers are a necessity.
The long-term value of this recipe lies in its freezer-friendliness, as the unbaked log can be stored for months. This allows you to have fresh-baked cookies on demand with very little effort or cleanup required.
- To Store: Keep in an airtight container at room temperature for up to 4 days.
- To Freeze: Wrap the unbaked log tightly in foil and freeze for up to 3 months.
- To Reheat: If already baked, a 10-second zap in the microwave restores the soft, buttery crumb.
