
Soft, chewy cookies with crisp edges and soft centers is exactly what makes Classic Soft & Chewy Chocolate Chip Cookies Golden edges, soft centers, and loaded with melty chocolate chips—this is the cookie everyone loves.
Ingredients: 2 ¼ cups all-purpose flour, 1 tsp baking soda, ½ tsp salt, ¾ cup unsalted butter, softened, ¾ cup brown sugar, ½ cup granulated sugar, 2 large eggs, 2 tsp vanilla extract, 2 cups chocolate chips.
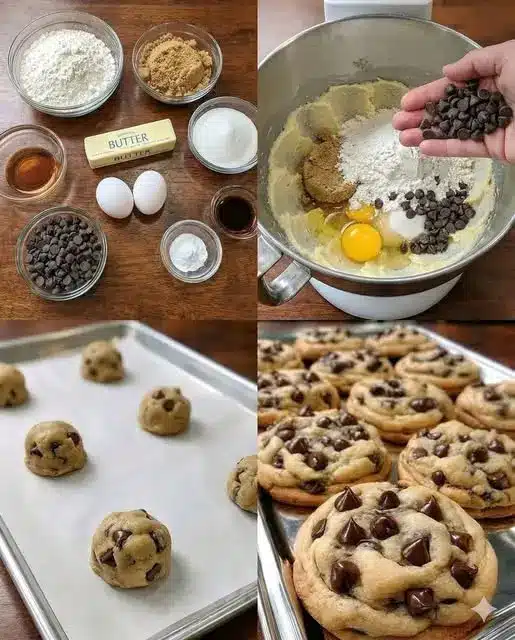
Instructions: Preheat oven to 350°F (175°C). Line baking sheets with parchment paper. In a bowl, whisk together flour, baking soda, and salt. In another bowl, cream butter, brown sugar, and granulated sugar until light and fluffy. Beat in eggs one at a time, then add vanilla. Gradually mix in the dry ingredients. Fold in chocolate chips. Scoop dough into balls and place on baking sheet, spacing apart. Bake 10–12 minutes, until edges are golden but centers are soft. Cool slightly, then enjoy warm or let cool completely. so hard to stop eating. This simple one-bowl method ensures you spend less time cleaning and more time enjoying the premium value of a homemade dessert. From homemademenus.com, this recipe is designed for the modern kitchen.
Preparation takes only fifteen minutes, yielding about two dozen cookies that disappear almost instantly. I like to keep a batch of this dough in the fridge for late-night cravings, a trick shared by Carmen Maria Márquez to ensure the deepest flavor profile. Whether you are a novice baker or a seasoned pro, the balance of sugars in this dough creates an unmistakable nostalgia that defines the perfect American cookie experience.
If you have been searching for that bakery-style texture that remains soft for days, you have finally found the ultimate solution. This guide will walk you through the essential techniques to master the perfect bake every single time.
Why This Recipe Is a Keeper
What Makes It Special
The secret lies in the ratio of brown sugar to granulated sugar, which provides a deep molasses undertone and a moist, tender crumb. This chemical balance prevents the cookies from becoming overly brittle as they cool on the wire rack.
Additionally, the specific temperature of the butter allows for a high-tier specialized aeration process during the creaming stage. This ensures a lift that keeps the center pillowy while the heat of the oven crisps the outer ring.
- Soft texture: High moisture content from the brown sugar ensures a bendable, gooey center.
- Quick method: No fancy equipment is required, making this accessible for a fast weeknight treat.
- Bold flavor: A generous amount of vanilla extract enhances the cocoa notes of the melty chips.
- Great yield: This recipe scales perfectly for large gatherings, offering investment-grade results for bake sales.
Ingredients: What You’ll Need
Key Ingredients
Ensure you use exact measurements and do not make broad swaps if you want to maintain the specific structural integrity of the cookie. Using professional-grade measuring cups is highly recommended for consistent results across different batches.
Always prioritize high quality unsalted butter to control the sodium levels and allow the sweet cream notes to shine through. The quality of your chocolate chips will also determine the final richness of each bite.
- 2 ¼ cups all-purpose flour: Provides the necessary structure for a thick cookie.
- 1 tsp baking soda: The essential leavening agent for browning and lift.
- ½ tsp salt: Balances the sweetness and enhances the chocolate profile.
- ¾ cup unsalted butter, softened: Creates a rich, buttery base for the dough.
- ¾ cup brown sugar: Adds moisture and a hint of caramel flavor.
- ½ cup granulated sugar: Helps create those sought-after crisp, golden edges.
- 2 large eggs: Binds the ingredients together for a cohesive texture.
- 2 tsp vanilla extract: Adds a fragrant, aromatic depth to the batter.
- 2 cups chocolate chips: The star ingredient for melty, gooey pockets of joy.
How to Make Classic Soft & Chewy Chocolate Chip Cookies Golden edges, soft centers, and loaded with melty chocolate chips—this is the cookie everyone loves.
Step-by-Step
Baking is a science, so following the order of operations is vital for achieving the correct emulsion between fats and sugars. Begin by organizing your workstation to ensure a smooth transition between mixing and scooping.
The “low and slow” concept doesn’t apply here; instead, a precise 350°F environment creates the perfect steam release for a soft interior. This bespoke agricultural attention to heat management ensures the bottoms don’t scorch before the tops are set.
Disclosure: This post contains affiliate links.If you click and make a purchase, I may earn a small commission at no extra cost to you.



- Prep: Preheat your oven to 350°F (175°C) and line two large baking sheets with parchment paper to prevent sticking.
- Dry Mix: In a medium-sized bowl, whisk together the flour, baking soda, and salt until no clumps remain.
- Creaming: In a separate large bowl, cream the softened butter with both sugars until the mixture is light, fluffy, and pale.
- Combine: Beat in the eggs one at a time, followed by the vanilla, then gradually fold in the dry flour mixture.
- Bake: Fold in the chocolate chips, scoop dough into 2-tablespoon balls, and bake for 10–12 minutes until edges are golden.
My Best Tips
Pro Tips
One essential tip from Carmen Maria Márquez is to chill the dough for at least thirty minutes before baking to prevent excessive spreading. This small step concentrates the flavors and results in a tier-one professional appearance.
When measuring your flour, always use the spoon-and-level method rather than scooping directly from the bag. This prevents packing too much flour into the cup, which can lead to a dry, cakey cookie instead of a chewy one.
- Softened butter: Ensure butter is room temperature, not melted, to maintain the air pockets during creaming.
- Underbake slightly: Pull the cookies out when the centers still look a bit soft; they finish cooking on the hot pan.
- Quality chips: Use a mix of milk and dark chocolate chips for a more complex flavor profile.
Easy Variations
Simple Twists
You can easily customize this base dough to fit your personal preferences or what you currently have in your pantry. Adding specialized regenerative ingredients like organic nuts or seeds can add a wonderful crunch to the soft base.
I encourage a creative twist by adding a sprinkle of sea salt on top immediately after removing the cookies from the oven. This creates a premium sweet-and-salty dynamic that is highly popular in gourmet bakeries.
- Nutty Crunch: Add ½ cup of chopped walnuts or pecans for extra texture.
- Double Chocolate: Swap ½ cup of flour for cocoa powder to create a chocolate-on-chocolate version.
Fixing Common Issues
Troubleshooting
If your cookies are spreading too thin, it is likely that your butter was too warm or you over-creamed the sugar. Chill the remaining dough to firm up the fats before placing the next batch into the oven.
For cookies that come out too hard, check your oven calibration or reduce the baking time by two minutes. Even a small capital-intensive transition to a new oven thermometer can save your future batches from over-browning.
- Flat cookies: Chill the dough for an hour; cold fats expand slower in the oven heat.
- Dry cookies: Do not over-mix the flour; stop as soon as the white streaks disappear.
How to Serve
Serving Ideas
Serve these cookies warm with a cold glass of milk for the ultimate family dessert or afternoon snack. They are a staple at any gathering and provide long-term return on effort when guests ask for the recipe.
These cookies also pair exceptionally well with Ice Cream for a DIY sandwich or can be crumbled over Pudding for added texture and flavor contrast.
Storage
Make Ahead
You can store these cookies in an airtight container at room temperature to keep them fresh for several days. This storage method maintains the long-term value of your baking session without losing the chewy consistency.
For those who want to plan ahead, the dough balls can be frozen and baked directly from the freezer with just a few extra minutes added to the timer.
- To Store: Keep in an airtight container for up to 4 days at room temperature.
- To Freeze: Freeze baked cookies or raw dough balls for up to 3 months in a freezer bag.
- To Reheat: Microwave for 10 seconds to restore that “fresh from the oven” melty chocolate feel.
