
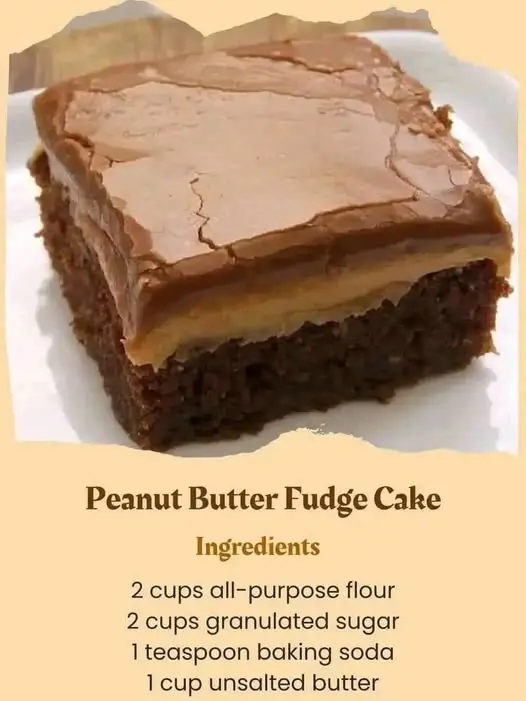
Soft, chewy chocolate cake with a creamy peanut butter layer and a rich fudge finish is exactly what makes Peanut Butter Fudge Cake so hard to stop eating. This one-pan wonder combines pantry staples into a gourmet dessert that satisfies every sweet craving. From homemademenus.com
This cake yields about 12 to 15 generous servings and takes roughly 45 minutes from start to finish. I like to make this for birthday parties because the poured frosting creates a professional look without any complicated decorating skills. Carmen Maria Márquez once told me that the key to the perfect crumb is ensuring the buttermilk is at room temperature before mixing.
If you are looking for a dessert that stays moist for days and features the classic combination of salty and sweet, you have found the right recipe. Keep reading to discover how to achieve that perfect fudgy texture every single time.
Why This Recipe Is a Keeper
What Makes It Special
The unique three-layer structure provides a variety of textures in every single bite, ranging from the light cake base to the dense peanut butter center. It is an incredibly forgiving recipe that works well for both novice bakers and experienced dessert enthusiasts alike.
Because the icing is poured over the cake while warm, it seeps slightly into the peanut butter layer to create a fudge-like consistency. This method ensures the cake remains moist even if you need to prepare it a day in advance for an event.
- Soft texture: The addition of buttermilk creates a tender crumb that melts in your mouth.
- Quick method: Boiling the wet ingredients first ensures the cocoa is fully bloomed for maximum flavor.
- Bold flavor: A full pound of peanut butter provides a rich, nutty contrast to the dark chocolate.
- Great yield: One 9×13 pan provides enough servings for a large group, offering premium value for your efforts.
Ingredients: What You’ll Need
Key Ingredients
Use exact measurements of 2 cups all-purpose flour and 2 cups granulated sugar to ensure the cake has the correct structural integrity. Do not swap the butter for oil, as the butter provides the essential fat content for the fudgy icing finish.
Investing in high quality unsweetened cocoa powder and pure vanilla extract will significantly improve the depth of flavor in the final product. Make sure your baking soda is fresh so the cake rises properly during its short time in the oven.
- 2 cups All-purpose flour: Provides the structural base for the chocolate sponge.
- 2 cups Granulated sugar: Sweetens the base and helps create a tender texture.
- 1 tsp Baking soda: Acts as the leavening agent for a light rise.
- 1 cup Unsalted butter: Adds richness and moisture to the cake batter.
- 1/4 cup Unsweetened cocoa powder: Gives the cake its signature deep chocolate flavor.
- 1 cup Water: Thins the batter to the perfect pourable consistency.
- 1/2 cup Buttermilk: Reacts with the baking soda for a soft, airy crumb.
- 2 large Eggs: Binds the ingredients together and adds necessary protein.
- 1 tsp Vanilla extract: Enhances the chocolate and peanut butter notes.
- 16 oz Creamy peanut butter: Creates the thick, salty-sweet middle layer.
- 16 oz Confectioners’ sugar: Forms the base of the silky fudge icing.
How to Make Peanut Butter Fudge Cake
Step-by-Step
The process begins with whisking your dry ingredients in a large bowl to ensure there are no lumps of flour or soda. You will then transition to the stovetop to create a hot chocolate mixture that brings the batter to life.
This low and slow melting method for the butter and cocoa ensures a smooth emulsion that integrates perfectly with the dry flour mixture. Once the cake is baked, the assembly happens quickly while the cake is still retaining some of its oven heat.
Disclosure: This post contains affiliate links.If you click and make a purchase, I may earn a small commission at no extra cost to you.



- Prep: Preheat your oven to 350° and grease a 9” x 13” baking pan with butter and flour.
- Boil wet ingredients: Melt 1 cup butter in a saucepan, then stir in cocoa, water, buttermilk, and eggs until boiling.
- Combine: Pour the hot mixture into the flour and sugar; stir until smooth and add the vanilla.
- Bake: Transfer the batter to the pan and bake for 20 to 25 minutes until a pick comes out clean.
- Layer: Cool for 10 minutes, spread the peanut butter over the cake, and then prepare the chocolate icing.
- Finish: Boil the icing ingredients, pour over confectioners’ sugar, stir in vanilla, and spread over the peanut butter.
My Best Tips
Pro Tips
Carmen Maria Márquez recommends spreading the peanut butter while the cake is still slightly warm so it glides easily without tearing the surface. If the peanut butter is too stiff, you can microwave it for fifteen seconds to make it more manageable.
When measuring your confectioners’ sugar, always sift it through a fine-mesh strainer to prevent small white lumps from appearing in your dark fudge icing. This step ensures a professional, glossy finish that looks beautiful under kitchen lights.
- Sift sugar: Always sift the powdered sugar to ensure a perfectly smooth and glossy icing.
- Low heat: Use medium-low heat when boiling the icing to prevent the milk from scorching.
- Cooling time: Allow the cake to cool completely after icing for the cleanest possible slices.
Easy Variations
Simple Twists
You can easily customize this recipe by adding a sprinkle of sea salt over the top of the fudge icing for a modern flavor. Another popular option is to use chunky peanut butter if you prefer a bit of crunch in every bite.
Adding a handful of chocolate chips to the batter before baking provides extra pockets of melted chocolate throughout the cake. This is a great way to encourage a more intense chocolate experience for true enthusiasts.
- Smokier: Add a pinch of espresso powder to the cake batter to deepen the cocoa flavor.
- Extra hearty: Top the finished cake with chopped Reese’s cups for an over-the-top presentation.
Fixing Common Issues
Troubleshooting
If your peanut butter layer is mixing too much with the icing, ensure you have let the peanut butter set for a few minutes before pouring the hot frosting. This creates a distinct barrier between the two decadent layers.
If the cake appears dry, you may have left it in the oven for too long; check it at the 20-minute mark next time. Different ovens vary in temperature, so using a standalone thermometer can help maintain accuracy.
- Icing too thin: Add more sifted powdered sugar if the icing doesn’t hold its shape after cooling.
- Cake sticking: Ensure you flour the pan thoroughly after greasing to allow for easy serving.
How to Serve
Serving Ideas
Serve this cake warm with a scoop of premium vanilla bean ice cream for a classic dessert experience the whole family will love. The contrast between the cold ice cream and the rich, room-temperature fudge is spectacular.
This dessert pairs well with a glass of cold milk, and understanding the history of Peanut butter helps appreciate this American staple. Adding a side of fresh berries can also provide a tart contrast to the sweetness of the Fudge topping.
Storage
Make Ahead
This cake is an excellent make-ahead option because the flavors actually deepen and improve after sitting for twenty-four hours. It provides long-term value for busy hosts who want to prep their desserts well before guests arrive.
Keep the cake covered tightly to ensure the edges do not dry out while sitting on your kitchen counter. If you live in a very humid climate, storing the cake in the refrigerator may help the icing maintain its structure.
- To Store: Keep at room temperature for 3 days or in the fridge for up to 5 days in an airtight container.
- To Freeze: Wrap individual slices in plastic wrap and freeze for up to 3 months for a quick treat.
- To Reheat: Microwave a single slice for 10 seconds to soften the peanut butter and fudge layers before eating.
