
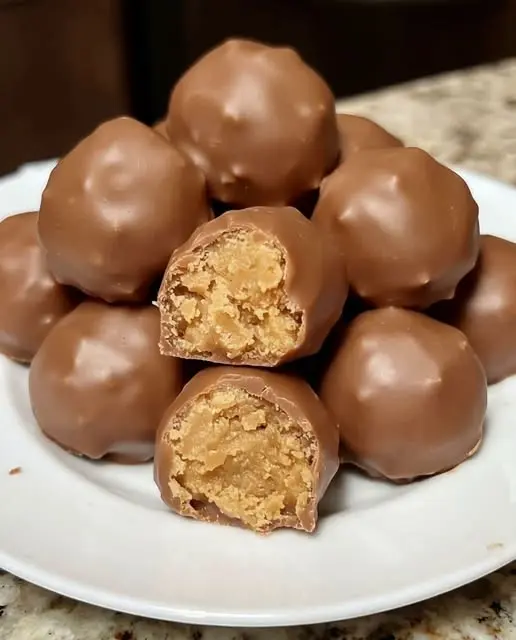
Soft, chewy no-bake treats with crisp chocolate shells and creamy peanut centers are exactly what makes Chocolate Peanut Butter Balls so hard to stop eating. This simple recipe provides a delicious shortcut to satisfying a sweet tooth without ever having to preheat the oven. From homemademenus.com, this recipe has become a staple for holiday gatherings and family parties.
This recipe yields approximately 36 decadent balls and takes about 20 minutes of active prep time, though you should allow for chilling. I like to prepare these on weekend afternoons so they are ready for a movie night or a lunchbox surprise. Carmen Maria Márquez once shared that the secret to the perfect texture is ensuring your butter is perfectly softened but not melted. If you are looking for a treat that tastes like a professional confection but requires minimal effort, you have found the right guide.
You might be surprised at how a few pantry staples can transform into a gourmet-style dessert that rivals any store-bought box of chocolates. Stay with me to learn the exact proportions and dipping techniques that will make your candies look like they came from a high-end bakery.
Why This Recipe Is a Keeper
What Makes It Special
This recipe creates a perfect harmony between the salty notes of the nut butter and the deep richness of the semi-sweet coating. The texture remains soft and fudge-like on the inside while maintaining a satisfying snap on the outside.
Unlike other desserts that can be overly crumbly or oily, this version uses specific ratios to ensure the balls hold their shape during the dipping process. Once you master this method, you will never go back to buying pre-packaged sweets again.
- Soft texture: The powdered sugar and butter create a melt-in-your-mouth consistency.
- Quick method: No baking is required, saving you time and kitchen heat.
- Bold flavor: A hint of vanilla and salt amplifies the premium value of the peanut profile.
- Great yield: One batch makes enough for a large party or multiple gift tins.
Ingredients: What You’ll Need
Key Ingredients
Use exact measurements to ensure the dough is firm enough to roll without sticking to your palms excessively. No broad swaps should be made for the fats, as the stability of the dessert depends on the ratio of solids to liquids.
Investing in high quality chocolate and fresh nut butter will significantly impact the final flavor profile of your Chocolate Peanut Butter Balls.
- 2 cups Creamy Peanut Butter: Provides the rich, nutty foundation for the center.
- 1/2 cup Unsalted Butter, softened: Adds a velvety richness and helps the centers set firmly.
- 1 tsp Vanilla Extract: Enhances the sweetness and adds an aromatic depth to the mix.
- 3 cups Powdered Sugar: Acts as the primary sweetener and the necessary binding agent.
- 1/4 tsp Salt: Essential for balancing the sugar and cutting through the fat.
- 2 cups Semi-Sweet Chocolate Chips: Creates a smooth, decadent outer shell when melted.
- 1 tbsp Coconut Oil: Thins the chocolate for a professional, glossy dipping consistency.
- 1/2 cup Graham Cracker Crumbs: Adds a subtle structural integrity and light crunch to the dough.
How to Make Chocolate Peanut Butter Balls
Step-by-Step
The process is incredibly straightforward and is a great way to involve younger family members in the kitchen. The key is patience during the chilling phase, which prevents the peanut butter from melting into the warm chocolate.
The chilling method ensures the centers are firm enough for easy dipping and a clean finish. Following these steps carefully will result in perfectly round, professional-looking treats every time.
Disclosure: This post contains affiliate links.If you click and make a purchase, I may earn a small commission at no extra cost to you.



- Prep: Line a large baking sheet with parchment paper or a silicone mat for easy removal.
- Mix dough: In a large bowl, beat the peanut butter, softened butter, vanilla, and salt until smooth.
- Add solids: Gradually stir in the powdered sugar and graham cracker crumbs until a stiff dough forms.
- Roll and chill: Shape into 1-inch balls and place on the tray, then freeze for 30 minutes.
- Finish: Melt the chocolate with coconut oil, dip each ball using a fork, and let set in the fridge.
My Best Tips
Pro Tips
Carmen Maria Márquez suggests using a toothpick or a specialized dipping tool to keep your finger marks off the chocolate. This simple trick ensures the Chocolate Peanut Butter Balls look as good as they taste.
Always measure your powdered sugar by spooning it into the cup rather than packing it down to maintain the right texture. If the dough feels too sticky to roll, simply chill the entire bowl for fifteen minutes before trying again.
- Rinse tools: Keep your hands slightly damp or dusted with sugar to prevent sticking during rolling.
- Cold centers: Never skip the freezing step, or the balls will fall apart in the warm chocolate.
- Quality chocolate: Use a brand you enjoy eating plain, as it is the most prominent flavor.
Easy Variations
Simple Twists
Once you are comfortable with the base recipe, you can start experimenting with different coatings and textures. These small changes can help you customize the recipe for different holidays or flavor preferences.
Adding a decorative drizzle or a different nut butter can completely change the personality of this classic dessert. Don’t be afraid to try new combinations to find your own signature version.
- Smokier: Use a dark chocolate coating with a 70% cocoa content for a less sweet finish.
- Extra hearty: Swap creamy peanut butter for a crunchy variety to add more texture.
Fixing Common Issues
Troubleshooting
If your chocolate is too thick, it will be difficult to get a smooth coating on the balls. Adding a tiny bit more oil can help it flow better and cover more evenly.
Sometimes the peanut butter may release oil if it gets too warm during the mixing process. If this happens, just add a tablespoon more of graham cracker crumbs to soak up the excess moisture.
- Dough too soft: Add another 1/4 cup of powdered sugar to stiffen the mixture.
- Chocolate cracking: Ensure you don’t overheat the chocolate, as scorched chocolate becomes brittle.
How to Serve
Serving Ideas
Serve these treats chilled on a decorative platter for a beautiful presentation at any family meal. They look particularly striking when arranged in a pyramid or placed in individual mini cupcake liners.
This recipe pairs well with a hot cup of coffee and shares many characteristics with traditional Peanut butter confections. Understanding the history of Chocolate candy making can also help you appreciate the simplicity of this no-bake method.
Storage
Make Ahead
These candies are excellent for making ahead of time because they actually improve in flavor as they sit. They are quite sturdy, making them the perfect choice for mailing in care packages during the winter months.
Storing these correctly ensures they maintain their long-term value and don’t absorb any unwanted odors from the refrigerator. Proper sealing is the most important factor for freshness.
- To Store: Keep in an airtight container in the fridge for up to 2 weeks.
- To Freeze: Place in a freezer-safe bag for up to 3 months for a quick snack.
- To Serve: Let them sit at room temperature for 10 minutes before eating for the best texture.
