If you’ve ever dreamed of creating the perfect pie that boasts a rich, flaky, and buttery crust, then the All Butter Pie Crust is your new best friend in the kitchen. This crust isn’t just a base; it’s the star that elevates every pie filling with its tender layers and melt-in-your-mouth texture. Discover the rich, flaky magic of All Butter Pie Crust and learn why it’s the secret to perfect pies every time.
Why You’ll Love This Recipe
- Unmatched Flavor: Using only butter provides a rich, natural flavor that enhances any filling.
- Delightfully Flaky Texture: The butter’s fat creates perfect layers, giving you that coveted crunch and softness.
- Simple Ingredients: Made from pantry staples, this crust is easy to prepare without complicated steps.
- Perfect for Any Pie: Whether you’re making a fruit pie, custard, or savory quiche, this crust adapts beautifully.
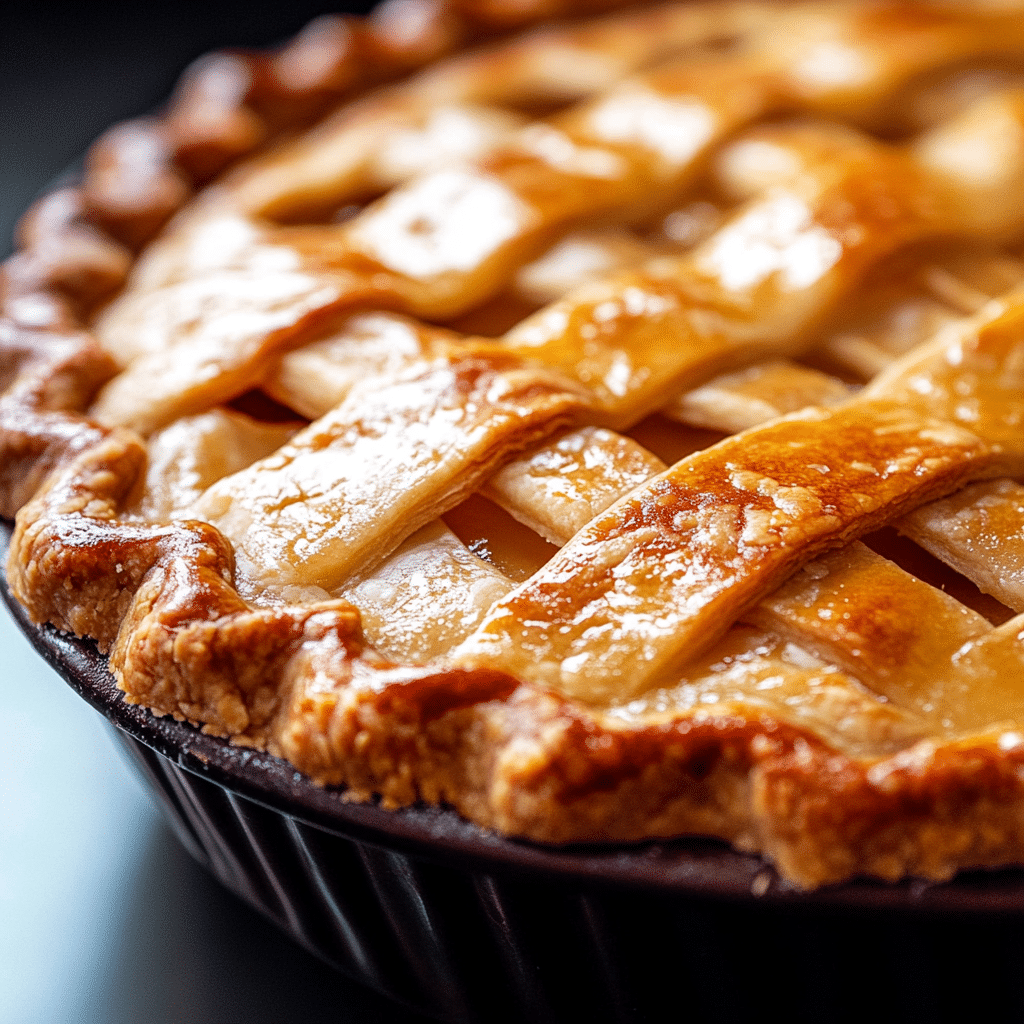
- Impressive Appearance: The golden color and flaky edges create a visually stunning pie every time.
Ingredients You’ll Need
Just a handful of quality ingredients are all it takes to craft the perfect All Butter Pie Crust. Each item plays a vital role in the crust’s structure, flavor, and texture, ensuring your pie is exceptional from the very first bite.
- Cold Unsalted Butter: The star ingredient, providing richness and flakiness; keep it chilled for best results.
- All-Purpose Flour: The foundation that gives structure, use fresh flour for optimal texture.
- Granulated Sugar (optional): A hint of sweetness enhances the crust’s flavor without overpowering.
- Salt: Balances flavors and intensifies the butter’s richness.
- Ice Cold Water: Essential for dough hydration while keeping the butter solid to maintain flakiness.
Variations for All Butter Pie Crust
One of the best things about the All Butter Pie Crust is how easily you can make it your own. Tailor it to suit your taste buds, dietary needs, or even experiment with different fillings without compromising that buttery goodness.
- Herb-Infused Crust: Add chopped fresh herbs like rosemary or thyme to create a savory twist, perfect for quiches.
- Whole Wheat Blend: Substitute half the flour with whole wheat for a nuttier flavor and added nutrition.
- Gluten-Free Option: Use a gluten-free flour blend matched with xanthan gum to maintain texture.
- Sweetened Crust: Increase sugar slightly for pies with tart fillings like lemon or sour cherry.
- Spiced Crust: Incorporate cinnamon or nutmeg for a warm, cozy crust that pairs excellently with autumn pies.


How to Make All Butter Pie Crust
Step 1: Chill Your Ingredients
Start by placing your butter and water in the refrigerator for at least an hour. Cold butter is essential for creating those flaky layers because it melts slowly during baking, allowing steam to create pockets in the dough.
Step 2: Mix Dry Ingredients
In a large bowl, whisk together the flour, sugar (if using), and salt. This ensures even distribution and prevents clumping when you add the butter.
Step 3: Cut in the Butter
Using a pastry cutter or your fingertips, cut the chilled butter into the flour mixture until pea-sized crumbs form. A few larger butter pieces can remain; these create additional flakiness.
Step 4: Add Ice Cold Water
Slowly add the ice cold water one tablespoon at a time, gently mixing just until the dough comes together. Avoid overworking — you want to preserve the butter’s cold state throughout.
Step 5: Form and Chill the Dough
Gather the dough into two discs, wrap them tightly in plastic wrap, and let them chill in the fridge for at least 1 hour. This rest period hydrates the flour and relaxes gluten for easier rolling.
Step 6: Roll Out and Use
Lightly flour your surface and roll out the dough to your desired thickness, about 1/8 inch is ideal. Transfer to your pie dish, trim edges neatly, and you’re ready to fill and bake!
Pro Tips for Making All Butter Pie Crust
- Keep Everything Cold: From butter to water to your hands, cold temperatures are critical for flakiness.
- Handle Dough Gently: Overworking activates gluten, making the crust tough instead of tender.
- Use a Pastry Cutter or Food Processor: For quick and efficient butter incorporation without warming it.
- Chill Twice: Refrigerate before rolling and after assembling your crust for better structure.
- Dock the Dough: For pies that require blind baking, poke holes to prevent bubbling during baking.
How to Serve All Butter Pie Crust
Garnishes
Top your pies with fresh herbs, edible flowers, or a dusting of powdered sugar to complement the crust’s golden edges and invite a burst of color and aroma.
Side Dishes
Serve your pies with dollops of whipped cream, vanilla ice cream, or a drizzle of caramel sauce that perfectly contrast the buttery crust and enhance overall flavor.
Creative Ways to Present
Try lattice tops, decorative cutouts, or brushing the crust with egg wash mixed with a bit of cream for an irresistible sheen and crunch.
Make Ahead and Storage
Storing Leftovers
Wrap any unused pie crust tightly with plastic wrap and keep it refrigerated for up to 3 days to maintain freshness and texture.
Freezing
For longer storage, freeze dough discs in airtight containers or heavy-duty bags for up to 2 months; thaw overnight in the fridge before rolling out.
Reheating
Reheat baked pies at 350°F for 10-15 minutes to restore the crispy texture, avoiding sogginess and keeping the butter flavor vibrant.
FAQs
Can I use salted butter instead of unsalted for All Butter Pie Crust?
While it’s okay in a pinch, unsalted butter gives you full control over seasoning, allowing you to adjust salt precisely for the best balance.
Why is my All Butter Pie Crust tough instead of flaky?
This usually happens from overmixing the dough, warming the butter too much, or rolling the dough too thin, all of which activate gluten and reduce tenderness.
Can I make All Butter Pie Crust ahead of time?
Absolutely! The dough can be made up to 2 days in advance and chilled or frozen for longer storage, making pie-making stress-free.
Is All Butter Pie Crust suitable for savory pies?
Definitely. The rich butter flavor complements savory fillings beautifully, especially when herbs or spices are added to the dough.
How do I prevent the crust from shrinking while baking?
Chill the dough well, avoid stretching it in the pie pan, and if pre-baking, use pie weights to keep it anchored and maintain shape.
Final Thoughts
Once you taste the buttery layers of an All Butter Pie Crust, there’s no turning back. This crust truly transforms every pie into a masterpiece worth sharing. Ready to wow your friends and family? Dive into making this crust and experience first-hand how it brings your favorite pies to delicious life!
Related Posts
Print
All Butter Pie Crust
- Total Time: 1 hour 15 minutes (including chilling)
- Yield: Enough for 2 single-crust pies or 1 double-crust pie 1x
- Diet: Vegetarian
Description
Discover the rich, flaky magic of All Butter Pie Crust—a buttery, tender crust that elevates every pie with unmatched flavor and flaky texture. Made from simple, quality ingredients, this crust is perfect for sweet or savory pies, adaptable to dietary preferences, and sure to impress with its golden, flaky edges.
Ingredients
Base Ingredients
- 1 cup (225g) cold unsalted butter, cubed
- 2 1/2 cups (312g) all-purpose flour
- 1 teaspoon salt
- 1 tablespoon granulated sugar (optional)
- 6 to 8 tablespoons ice cold water
Optional Variations
- Chopped fresh herbs (rosemary, thyme) for herb-infused crust
- Substitute half the flour with whole wheat flour for a whole wheat blend
- Gluten-free flour blend with xanthan gum for gluten-free crust
- Extra sugar (1-2 tablespoons) for sweetened crust
- Cinnamon or nutmeg for spiced crust
Instructions
- Chill Your Ingredients: Place the cold unsalted butter and ice cold water in the refrigerator for at least one hour to ensure they remain chilled for the best flaky texture.
- Mix Dry Ingredients: In a large bowl, whisk together the all-purpose flour, salt, and granulated sugar if using. This combines them evenly and prevents clumps when you add the butter.
- Cut in the Butter: Using a pastry cutter or your fingertips, cut the chilled butter into the flour mixture until pea-sized crumbs form. Leaving some larger butter pieces enhances flakiness.
- Add Ice Cold Water: Slowly add the ice cold water one tablespoon at a time, gently mixing with a fork just until the dough starts to come together. Avoid overworking to keep the butter cold and dough tender.
- Form and Chill the Dough: Gather the dough into two discs, wrap them tightly in plastic wrap, and chill in the refrigerator for at least 1 hour to hydrate the flour and relax gluten.
- Roll Out and Use: Lightly flour your surface and roll each dough disc to about 1/8 inch thickness. Transfer to your pie dish, trim edges neatly, and proceed with your pie filling and baking.
Notes
- Keep all ingredients and tools cold to ensure a flaky crust.
- Handle the dough gently to prevent gluten development and avoid toughness.
- Using a pastry cutter or food processor speeds up butter incorporation while keeping it cold.
- Chill the dough twice: once before rolling and again after assembling the crust.
- Dock the dough before blind baking to prevent bubbling.
- Store unused dough wrapped tightly in the refrigerator for up to 3 days or freeze for up to 2 months.
- Reheat baked pies at 350°F (175°C) for 10-15 minutes to restore crispiness.
- To prevent shrinking, avoid stretching dough in the pan and use pie weights if blind baking.
- Prep Time: 15 minutes (plus chilling time)
- Cook Time: Varies depending on pie filling
- Category: Dessert
- Method: Baking
- Cuisine: American
Nutrition
- Serving Size: 1/8 of crust
- Calories: 210
- Sugar: 1 g
- Sodium: 150 mg
- Fat: 16 g
- Saturated Fat: 10 g
- Unsaturated Fat: 5 g
- Trans Fat: 0 g
- Carbohydrates: 14 g
- Fiber: 1 g
- Protein: 2 g
- Cholesterol: 40 mg