
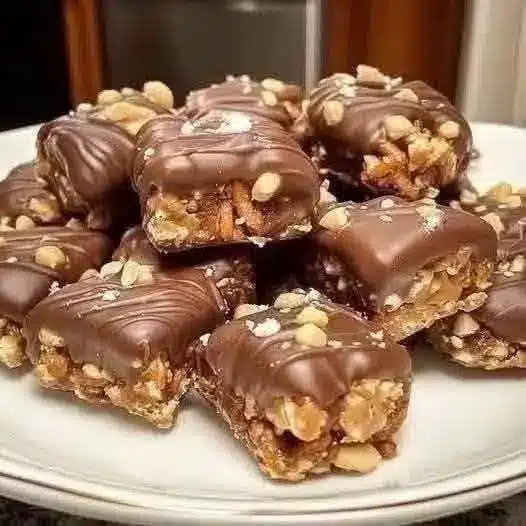
Soft, chewy textures with a crisp finish and a decadent gooey center are exactly what makes Chocolate Peanut Caramel Bars so hard to stop eating. This no-bake method allows you to create a gourmet-style treat that rivals any store-bought candy bar without turning on the oven. From homemademenus.com, this recipe is designed for ease and flavor.
This recipe yields approximately 16 to 20 bars depending on how large you slice them, making it perfect for parties or lunchbox treats. I, Carmen Maria Márquez, like to prepare these on Sunday afternoons because they stay fresh all week long. They offer a nostalgic flavor profile that appeals to children and adults alike while maintaining a sophisticated texture.
The combination of salty roasted peanuts and sweet, buttery caramel is a timeless pairing that never fails to impress. This curiosity hook keeps everyone coming back for a second piece, so be prepared to share the recipe with your friends and family.
Why This Recipe Is a Keeper
What Makes It Special
The contrast between the crunchy roasted peanuts and the silky milk chocolate coating provides a multisensory experience in every bite. This recipe uses a specific ratio of honey and peanut butter to ensure the base remains soft enough to chew but firm enough to hold its shape.
By incorporating crispy rice cereal, you add an airy lightness that prevents the bars from becoming overly dense or heavy. This retention hook ensures that the texture remains balanced and enjoyable through the very last crumb.
- Soft texture: The honey and brown sugar mixture keeps the center tender.
- Quick method: Since there is no baking required, you save time and energy.
- Bold flavor: Using salted peanuts provides a premium value contrast to the sweet chocolate.
- Great yield: One 8×8 pan produces enough servings for a large gathering.
Ingredients: What You’ll Need
Key Ingredients
Use exact measurements for the binding agents like honey and peanut butter to ensure the bars set properly during the refrigeration stage. Making broad swaps can result in a base that is either too sticky or too dry to slice.
Selecting high quality chocolate chips and fresh roasted peanuts will significantly elevate the final flavor of your homemade candy bars. Using fresh ingredients ensures the oils in the nuts are sweet rather than bitter.
- 2 cups roasted peanuts: Use salted or unsalted based on your preference.
- 1 cup crispy rice cereal: Provides the essential light crunch.
- 1 cup peanut butter: Creamy style works best for a smooth texture.
- 1/2 cup honey: Acts as the primary binder for the base.
- 1/4 cup brown sugar: Adds a deep molasses sweetness.
- 1 tsp vanilla extract: Enhances the aromatic profile of the filling.
- 1 cup soft caramel candies: Provides the gooey middle layer.
- 2 tbsp heavy cream: Thins the caramel for easier spreading.
- 2 cups milk chocolate chips: Creates a sweet and classic coating.
- 1 tbsp coconut oil: Helps the chocolate set with a glossy finish.
How to Make Chocolate Peanut Caramel Bars
Step-by-Step
The preparation process is straightforward and relies on gentle heating to combine the sugars and fats into a cohesive dough. You must work quickly once the syrup is ready to ensure the cereal is evenly coated before it cools.
For the best results, use the low and slow method when melting your chocolate coating to prevent it from scorching or seizing. This patience results in a professional-looking finish that mirrors a high-end confectionery shop.
Disclosure: This post contains affiliate links.If you click and make a purchase, I may earn a small commission at no extra cost to you.



- Prepare the filling: Combine peanut butter, honey, and brown sugar in a saucepan over medium heat until bubbling.
- Fold in dry items: Remove from heat, stir in vanilla, then fold in peanuts and crispy rice cereal.
- Add caramel layer: Melt caramel candies with heavy cream until smooth and spread over the pressed peanut mixture.
- Shape and chill: Press the mixture firmly into a lined 8×8-inch pan and refrigerate for at least one hour.
- Coat with chocolate: Cut into bars, dip each into melted chocolate mixed with coconut oil, and let harden on parchment.
My Best Tips
Pro Tips
Carmen Maria Márquez suggests lining your pan with parchment paper that hangs over the edges to create a “sling” for easy removal. This prevents the caramel from sticking to the sides and ensures your bars have clean, straight edges.
Always measure your ingredients carefully using standard measuring cups to maintain the delicate balance between the liquid sweeteners and the dry cereal. Precision is the key to a bar that holds its structure at room temperature.
- Firm pressing: Use the bottom of a flat glass to press the mixture into the pan corners.
- Chill thoroughly: Do not rush the refrigeration process or the bars will fall apart when dipped.
- Sea salt finish: A pinch of flaky salt on top of the wet chocolate balances the richness perfectly.
Easy Variations
Simple Twists
You can easily modify this recipe to suit different dietary preferences or to use up what you already have in your pantry. Swapping the type of nut or chocolate can completely transform the flavor profile.
Encouraging a creative twist allows you to customize the bars for specific holidays, such as adding festive sprinkles or different flavored extracts. Trying a new variation makes the recipe feel fresh every time you make it.
- Dark chocolate: Use semi-sweet or dark chocolate chips for a less sweet, more intense flavor.
- Almond version: Swap the peanut butter and peanuts for almond butter and roasted almonds.
Fixing Common Issues
Troubleshooting
If your bars are too crumbly, it is often because the honey mixture was not boiled long enough to activate its binding properties. Ensure it reaches a gentle bubble before removing it from the heat source.
If the chocolate coating is too thick to dip, add an extra teaspoon of coconut oil to thin the consistency. This makes the dipping process much smoother and results in a thinner, more elegant shell.
- Sticky bars: If they remain too soft, store them permanently in the refrigerator.
- Chocolate seizing: Keep all water away from the chocolate while melting to prevent it from turning grainy.
How to Serve
Serving Ideas
Serve these bars chilled or at room temperature for a delicious family dessert or a high-energy snack. They are sturdy enough to be packed in a cooler for picnics or outdoor sporting events.
This treat pairs exceptionally well with a cold glass of milk or a cup of dark roast coffee. Understanding the history of Peanut butter and the chemistry of Caramel can help you appreciate the complexity of these simple ingredients.
Storage
Make Ahead
These bars are an excellent make-ahead option because they retain their texture and flavor for a significant amount of time. Proper storage ensures that the chocolate remains snappy and the center stays chewy.
The long-term value of this recipe lies in its ability to be frozen, allowing you to have a gourmet treat ready at a moment’s notice. Simply thaw for a few minutes before serving to guests.
- To Store: Keep in an airtight container in the refrigerator for up to 2 weeks.
- To Freeze: Wrap individual bars in plastic and freeze for up to 3 months.
- To Reheat: If you prefer a softer caramel, let them sit at room temperature for 15 minutes.
