
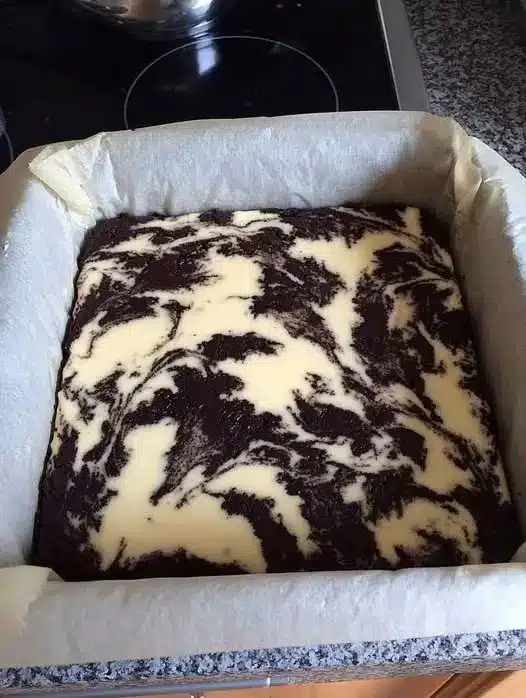
Soft, chewy keto cheesecake brownies with crisp edges and a silky center is exactly what makes Brownie Cheesecake Swirl Bars Can’t decide between brownies and cheesecake? Don’t. You get BOTH here. The base is a dense, ultra-fudgy keto brownie that’s rich and chocolatey without being cakey. Then comes the dreamy cheesecake layer, marbled right through with a knife for those gorgeous bakery-style swirls. It’s decadent, not too sweet, and tastes like a cheat day while keeping carbs in check. Every bite gives you crackly brownie edges AND silky cheesecake. Best of both worlds? Absolutely. so hard to stop eating. This low-carb method ensures you get a bakery-quality treat without the sugar spike. From homemademenus.com
I find that these bars are perfect for meal prep, yielding about 16 generous squares that stay moist for days. I like to prepare these on Sunday evenings so my family has a healthy, high-protein dessert option throughout the week. Carmen Maria Márquez often suggests using room temperature ingredients to ensure the cheesecake layer is perfectly smooth. This simple trick makes a world of difference in the final texture.
If you have ever struggled to choose between a rich chocolate Brownie and a creamy slice of Cheesecake, this hybrid recipe is your ultimate solution. Stay tuned to learn how to master the perfect marble swirl.
Why This Recipe Is a Keeper
What Makes It Special
The contrast between the dense, fudgy brownie base and the light, tangy cheesecake topping creates a multi-dimensional dessert experience. Unlike traditional keto bakes that can be dry, these bars rely on high-fat ingredients to maintain a luxurious mouthfeel.
This recipe uses accessible ingredients found at any local grocery store, making it a reliable staple for your keto kitchen. Once you master the basic technique, you can customize the sweetness levels to fit your specific dietary needs.
- Soft texture: The almond flour base keeps these bars incredibly moist and fudgy.
- Quick method: You can have the entire pan in the oven in under 20 minutes.
- Bold flavor: Unsweetened cocoa powder provides a deep, dark chocolate taste that isn’t overly sweet.
- Great yield: This recipe produces 16 bars, offering premium value for your weekly meal planning.
Ingredients: What You’ll Need
Key Ingredients
Use exact measurements to ensure the brownies set correctly; substituting flour types may alter the density of the fudgy base. We recommend using high quality grass-fed butter to enhance the richness of the chocolate layer.
- 1 1/2 cups almond flour: The gluten-free, low-carb foundation for the brownie.
- 1/2 cup unsweetened cocoa powder: Provides the intense chocolate flavor.
- 3/4 cup granulated monk fruit: A natural sweetener that measures 1:1 with sugar.
- 1/2 cup unsalted butter, melted: Adds essential fats for a fudgy consistency.
- 2 large eggs: Room temperature eggs help the batter emulsify properly.
- 1 tsp vanilla extract: A classic flavor enhancer for both layers.
- 8 oz cream cheese, softened: The primary ingredient for the decadent cheesecake swirl.
- 1/4 cup powdered erythritol: Dissolves quickly for a smooth cheesecake texture.
- 1 large egg (for topping): Binds the cheesecake layer so it sets firmly.
How to Make Brownie Cheesecake Swirl Bars Can’t decide between brownies and cheesecake? Don’t. You get BOTH here. The base is a dense, ultra-fudgy keto brownie that’s rich and chocolatey without being cakey. Then comes the dreamy cheesecake layer, marbled right through with a knife for those gorgeous bakery-style swirls. It’s decadent, not too sweet, and tastes like a cheat day while keeping carbs in check. Every bite gives you crackly brownie edges AND silky cheesecake. Best of both worlds? Absolutely.
Step-by-Step
This process involves making two separate batters and then combining them with a simple marbling technique before baking. A slow and steady hand while swirling ensures you get those beautiful white and dark chocolate patterns.
Preheat your oven to 350°F and grease an 8×8 inch baking pan with butter or parchment paper for easy removal. Using parchment paper is the secret to getting clean, sharp edges when you finally slice the bars.
Disclosure: This post contains affiliate links.If you click and make a purchase, I may earn a small commission at no extra cost to you.



- Prep: Mix the almond flour, cocoa powder, monk fruit, melted butter, 2 eggs, and vanilla in a bowl until a thick brownie batter forms.
- Base Layer: Spread about 3/4 of the brownie batter into the bottom of your prepared baking pan, smoothing it with a spatula.
- Cheesecake Mix: In a separate bowl, beat the softened cream cheese, powdered erythritol, 1 egg, and extra vanilla until creamy and light.
- Swirl: Dollop the cheesecake mixture over the brownie base, then drop spoonfuls of the remaining brownie batter on top; swirl with a knife.
- Finish: Bake for 25-30 minutes until the edges are set; let cool completely in the pan before slicing into 16 squares.
My Best Tips
Pro Tips
Carmen Maria Márquez recommends chilling the bars in the refrigerator for at least two hours before slicing to achieve the cleanest cuts. This allows the fats in the cream cheese and butter to firm up, creating a professional look.
Always measure your almond flour using the “spoon and level” method rather than scooping directly from the bag to avoid a dry brownie. Precision in measurement is the key to maintaining that signature fudgy keto texture.
- Softened cheese: Ensure your cream cheese is very soft to avoid lumps in the swirl.
- Don’t overbake: Pull them out when the center still has a slight jiggle for maximum fudginess.
- Parchment overhang: Leave a bit of paper hanging over the sides to lift the whole block out easily.
Easy Variations
Simple Twists
You can easily modify this base recipe to include different textures or flavor profiles depending on your pantry staples. Adding a bit of crunch or a different extract can transform the entire dessert.
I encourage you to try a nutty twist by adding crushed walnuts or pecans to the brownie batter before baking. It adds a wonderful contrast to the silky cheesecake layer.
- Smokier: Add a pinch of sea salt on top before baking to enhance the chocolate.
- Extra hearty: Fold in 1/4 cup of sugar-free chocolate chips for double the chocolate hit.
Fixing Common Issues
Troubleshooting
If your cheesecake layer is turning brown, you may be baking the bars on a rack that is too high in the oven. Move the pan to the center rack to ensure even heat distribution for both the top and bottom.
If the bars seem too soft even after cooling, they may simply need more time to set in the refrigerator. Keto desserts often require a cold environment to reach their final intended consistency.
- Batter too thick: Add one tablespoon of heavy cream if the brownie batter is too stiff to spread.
- Grainy texture: Use powdered sweetener instead of granulated in the cheesecake layer for a smoother finish.
How to Serve
Serving Ideas
Serve these bars chilled or at room temperature with a dollop of sugar-free whipped cream for a family dessert. They are rich enough to be served on their own, but a side of fresh raspberries adds a lovely tartness that cuts through the cream cheese.
These bars pair exceptionally well with a hot cup of black coffee or unsweetened almond milk. The bitterness of the coffee highlights the rich cocoa notes in the brownie base.
Storage
Make Ahead
These brownies are actually better the second day as the flavors have more time to meld together in the fridge. This makes them an ideal candidate for long-term value during a busy work week.
Because of the dairy content in the cheesecake, these must be stored in a temperature-controlled environment. Leaving them on the counter for too long will cause the topping to soften significantly.
- To Store: Keep in the fridge for up to 5 days in an airtight container.
- To Freeze: Wrap individual squares in plastic wrap and freeze for up to 3 months.
- To Reheat: Let them thaw in the fridge overnight; do not microwave, as the cheesecake will melt.
