
Soft, delicate cookies with crisp edges and a buttery center is exactly what makes Piped Butter Cookies so hard to stop eating. This professional method ensures your treats look like they came from a high-end bakery while maintaining a simple preparation process. From homemademenus.com
This recipe yields about 24 cookies and takes only 40 minutes from start to finish, including chilling time. I like to serve these during the holidays because they are so aesthetically pleasing, and Carmen Maria Márquez recommends them as a staple for any home baker’s repertoire.
If you have been looking for a cookie that holds its shape and melts in your mouth, this guide will show you every secret to success.
Why This Recipe Is a Keeper
What Makes It Special
The combination of high-fat butter and cornstarch creates a tender crumb that literally dissolves on your tongue. It provides a luxurious mouthfeel that standard sugar cookies simply cannot replicate.
This dough is specifically engineered for piping, meaning it is soft enough to squeeze through a nozzle but sturdy enough to maintain intricate details. This balance is the key to achieving those beautiful, professional-looking ridges.
- Soft texture: The addition of cornstarch ensures a delicate, melt-away finish.
- Quick method: You can go from mixing to baking in less than half an hour.
- Bold flavor: High-quality vanilla and creamed butter provide a rich, nostalgic taste.
- Great yield: This batch produces enough to share while providing premium value for your pantry ingredients.
Ingredients: What You’ll Need
Key Ingredients
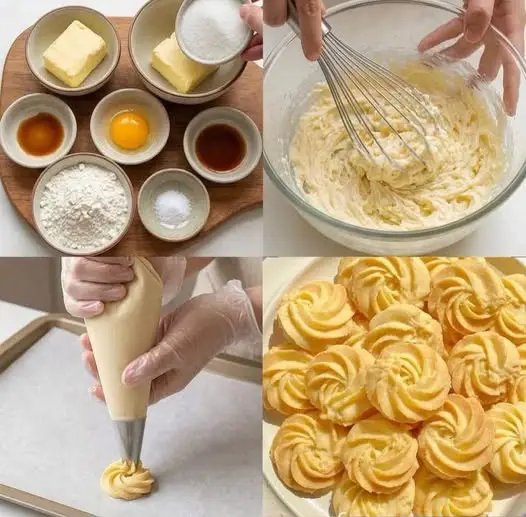
Ensure you use exact measurements to maintain the proper dough consistency for piping. Room temperature ingredients are vital for a smooth emulsion.
Using high quality ingredients, particularly the butter and vanilla, will significantly impact the final flavor profile of these cookies.
- 250g unsalted butter, softened: Provides the rich, creamy foundation and structure.
- 100g icing sugar: Creates a smooth texture without the graininess of granulated sugar.
- 1 large egg: Acts as the binder to hold the delicate crumb together.
- 1 tsp vanilla extract: Adds a sweet, aromatic depth to the buttery dough.
- 300g all-purpose flour: The main structural component for a stable cookie.
- 30g cornstarch: Softens the proteins in the flour for a tender bite.
- 1/4 tsp salt: Enhances the sweetness and balances the rich fats.
- 1–2 tbsp milk: Only used to adjust the dough if it becomes too stiff to pipe easily.
How to Make Piped Butter Cookies
Step-by-Step
The secret to perfect cookies lies in the creaming process and the short chilling period before the tray hits the oven. Proper aeration during the first step creates a light, airy biscuit.
Follow this low and slow method for a golden finish that highlights the intricate piped designs. Precision in piping will yield the most consistent baking results across the entire tray.
Disclosure: This post contains affiliate links.If you click and make a purchase, I may earn a small commission at no extra cost to you.



- Prep: Preheat your oven to 170°C (340°F) and line a large baking tray with high-quality parchment paper.
- Cream butter: Beat the softened butter and icing sugar for 3–5 minutes until the mixture is very light and fluffy.
- Emulsify: Add the egg and vanilla extract to the bowl and beat until fully incorporated and smooth.
- Sift dry: Sift together the all-purpose flour, cornstarch, and salt to remove any lumps and aerate the mixture.
- Mix dough: Gradually add the dry ingredients to the butter mixture, mixing until a soft, pipeable dough forms.
- Adjust: If the dough feels too stiff to move, add milk one tablespoon at a time until it reaches the right consistency.
- Bag: Transfer the dough into a sturdy piping bag fitted with a large star nozzle for classic shapes.
- Pipe: Pipe the cookies into rosettes, swirls, or small flower shapes onto the prepared baking tray.
- Chill: Place the tray in the fridge for 10–15 minutes to help the cookies hold their shape during baking.
- Bake: Bake for 10–14 minutes, or until the edges are just starting to turn a light golden brown.
- Cool: Let them rest on the tray for 5 minutes before transferring to a wire rack to cool completely.
My Best Tips
Pro Tips
Always use a metal or high-quality silicone piping bag because the dough can be quite firm, according to Carmen Maria Márquez. Plastic bags may burst if the dough is slightly too cold or thick.
Accurate measuring is essential, so I highly recommend using a kitchen scale for the flour and sugar. Volumetric measurements can vary wildly and affect how the cookie spreads.
- Temperature matters: Ensure the butter is soft but not melting to maintain the air bubbles.
- Chill time: Never skip the chilling step, as it prevents the butter from spreading too fast.
- Star nozzle: Use a wide star tip like a 1M or 2D to get those defined, beautiful ridges.
Easy Variations
Simple Twists
You can easily customize this base recipe to fit different holidays or flavor preferences. These minor changes do not affect the piping consistency of the dough.
I encourage you to experiment with different extracts or toppings to create a unique signature version of this classic treat.
- Chocolate Dipped: Dip half of the cooled cookie into melted dark chocolate and top with sprinkles.
- Citrus Zing: Add the zest of one lemon or orange to the butter mixture for a bright, fresh flavor.
Fixing Common Issues
Troubleshooting
If your cookies are spreading too much, it is usually a sign that the butter was too warm or the oven was not preheated. Always check your oven temperature with a thermometer for accuracy.
If the dough is impossible to squeeze out, the flour may have been packed too tightly into your measuring cup. Add a tiny splash of milk to loosen it up.
- Ridges disappearing: Ensure you chilled the dough long enough before putting it into the oven.
- Tough cookies: Avoid overmixing the dough once the flour is added to prevent gluten development.
How to Serve
Serving Ideas
Serve these warm with a cup of Earl Grey tea or a robust coffee for a classic afternoon snack. They make a wonderful addition to a holiday gift box or a dessert charcuterie board.
These cookies pair beautifully with Butter cookie traditions and benefit from a light dusting of cocoa powder or extra Vanilla sugar for added flair.
Storage
Make Ahead
Keep these cookies in an airtight container at room temperature to maintain their signature crispness. They are best enjoyed within the first few days of baking.
For long-term value, you can freeze the unbaked piped shapes and bake them directly from the freezer whenever guests arrive.
- To Store: Keep in a dry, cool place in an airtight tin for up to 4 days.
- To Freeze: Store baked cookies in a freezer-safe bag for up to 3 months.
- To Reheat: If they soften, a quick 2-minute refresh in a warm oven will restore the crisp edges.
